Archive | Brunch RSS feed for this section

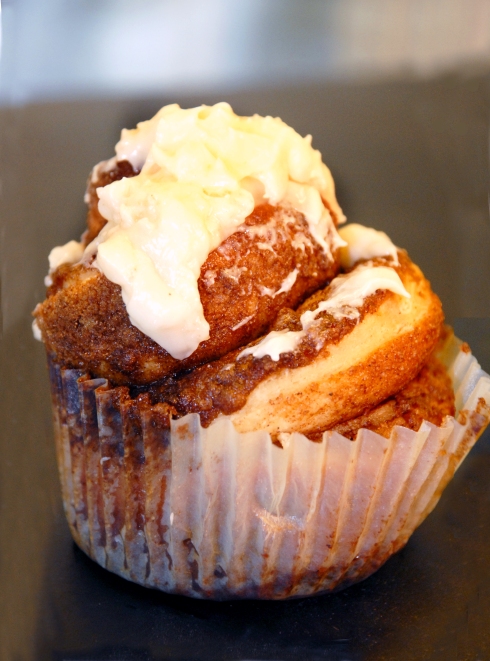
Cupcake-Style Cinnamon Rolls

14 Oct

I’m not sure if there is a cuter idea out there than cinnamon rolls baked as if they were cupcakes and I’ve been dying to try this from the moment I saw them on Pinterest!  While I love a big gooey messy cinnamon roll that you have to eat with a fork and knife just as much as the next person, there was something so quaint and wonderful by being able to peel the wrapper off just like a cupcake and eat it out of my hand.  I would imagine these being great for brunches or breakfasts with kids around so you can just hand them a roll and send them on their way.

They’re certainly not for the completely novice baker, as they have a lot of steps involved, but if they weren’t doable, I wouldn’t be posting it for you try, so get in that kitchen!

The best part about these rolls is that you don’t have to wake up at 4:00 in the morning in order to have fresh-baked cinnamon buns in the morning–I’ve included instructions for par-baking, which means baking the rolls just until they’re set, but not golden brown and perfect yet.  Then you can just throw them into the freezer until you’re ready for them, move them to the fridge the night before, and then just pop in the oven the next morning for ten minutes.  Only 10 minutes to an amazing, cinnamon-y, sweet, delicious breakfast!

Buns:

  • 1 cup warm milk
  • 2 eggs, room temperature
  • 1/3 cup butter, melted
  • 4 1/2 cups bread flour or regular flour (bread flour makes for a lighter cinnamon roll)
  • 1 teaspoon salt
  • 1/2 cup white sugar
  • 1 pkg yeast (1/4 ounce)

Filling:

  • 1 cup brown sugar, packed
  • 2 1/2 tablespoons ground cinnamon
  • 1/3 cup butter, softened

Icing:

  • 8 oz cream cheese, softened
  • 1/4 cup (4 tablespoons) butter, softened
  • 1 1/2 cups confectioners’ sugar
  • 1/2 teaspoon vanilla extract
  • 1/8 teaspoon salt
  1. Microwave milk for 30-40 seconds in the microwave (you want milk to be about 110 degrees). Dissolve yeast in warm milk in a large bowl.
  2. Add sugar, butter, salt, eggs, and flour; mix well.
  3. Knead dough into a large ball, using your hands dusted lightly with flour. Put in a bowl sprayed with cooking spray and cover tightly with plastic wrap. Let rise in a warm place about 1 hour or until dough has doubled in size; line 2 cupcake tins with cupcake liners and lightly spray the cupcake liners with baking spray.
  4. In a small bowl, thoroughly combine brown sugar and cinnamon.
  5. Sprinkle flour on the surface you’re going to roll the dough on.  Roll dough into a 16×21 inch rectangle about 1/4 inch thick. Spread dough with 1/3 cup softened butter (if your butter isn’t soft enough at this point, put it in a bowl and smear it around in the bowl with a wooden spoon until you can whip the spoon around through the butter) (other note: I used an offset spatula for spreading the butter and it was the PERFECT tool for the job).
  6. Sprinkle buttered dough evenly with sugar/cinnamon mixture. Roll up dough starting with the longer side and cut into 24 evenly sized rolls–to ensure even slices I just keep dividing each portion in halves or thirds (if you’re just doing normal rolls and not cupcake-style, cutting into 12 pieces is preferable)
  7. You’ll likely need to un-roll and re-roll the buns to fit in each of the cupcake lined spots.  Or, if you’re not in the mood for the cupcake-style, arrange the rolls in a lightly greased 9×13 inch glass baking dish.
  8. Cover and let rise until nearly doubled, about 30 minutes; in the meantime preheat oven to 350 degrees.
  9. If serving immediately, bake the cinnamon rolls for 15-20 minutes until golden brown.  If par-baking the cinnamon rolls to freeze for a later date, bake for 10 minutes until mostly baked but not browned.  Pull the buns out and let them cool completely before wrapping them tightly in saran wrap and tin foil and putting in the freezer.  The night before serving the rolls, unwrap them and put them in the fridge overnight to defrost.  The next morning, preheat oven to 350 degrees and bake for approximately 10 minutes until soft and golden brown.
  10. While in the oven, beat together cream cheese, butter, confectioners’ sugar, vanilla extract and salt. Spread frosting on while they are still warm so that the frosting melts into the roll.

Lemon Cheesecake Cheese Ball

24 Aug

The last of my party recipes for now and, admittedly the second cheesecake recipe in a row, but this one is a great way to have a dessert on the buffet table that takes literally minutes to throw together the night before.  And who doesn’t like cheesecake?  So I think you’ll forgive me for the cheesecake overload this week.  Also, this is a completely different take on cheesecake as it doesn’t have to be dessert–it’s not heavy at all so you can have it as a lightly sweet appetizer on the brunch table or party buffet.

Definitely make this the night before as it needs to chill in the fridge for a few hours first.  Also, make sure that when you’re crushing up the graham cracker crumbs the next day, you’re not rushing to get stuff done before guests arrive–I was (when am I not frantically running around?) and 5 minutes before my guests came, my rolling pin slipped and accidentally flung graham cracker crumbs all over the entire kitchen and the girls showed up to me frantically sweeping up the kitchen floor and counters.

Regardless of the easily avoidable mess, this recipe is practically the opposite of Monday’s recipe–instead of dark strong chocolatey coffee flavors, this one is light and refreshing and perfect for an end of the summer party.

Lemon Cheesecake Cheese Ball
Adapted from Annie’s Eats

  • 10 oz. cream cheese
  • 2½ tbsp. sugar
  • Zest of 1 large lemon
  • 4 tsp. freshly squeezed lemon juice
  • 3 graham crackers
  1. Mix cream cheese and sugar together–though it will be more like mushing together and less like stirring.
  2. Mix in lemon zest and lemon juice
  3. Place a piece of plastic wrap on the counter and spoon the mixture into a little heap in the center.  Fold the wrap over the mound and shape the mixture into a ball shape.
  4. Refrigerate for at least 3 hours, overnight is fine and reshape if necessary when you pull it out.
  5. Crush the graham crackers into fine crumbs and roll the ball in the crumbs until evenly coated.  If necessary, take pinches of the crumbs and gently press them in to any spots that look a little bare.
  6. Serve with sliced fruits (I liked it with green apples and nectarines) and, my personal favorite, Nilla Wafers.

French Cruller Doughnuts with Maple Vanilla Bean Glaze

17 Aug

Who on earth thought you could make doughnuts at home?  I always just thought they were something that magically appeared in boxes labeled “Krispy Kreme” on Sunday mornings.  Even once I actually went to a Krispy Kreme store and saw the factory machine churning out glazed doughnuts, it still felt more like a Disneyland attraction than actually connecting in my brain as the creation of food I was about to eat, much less food that I might be able to make at home myself.

I can’t remember how I came across this recipe on a great blog, Not So Humble Pie, for French crullers, but I do know that something struck me about this recipe.  It was the first recipe for doughnuts that I came across that I actually felt I could make at home.  Bonus: Crullers are the healthiest doughnut you can enjoy because they’re so airy which means fewer calories.

As always a few notes before beginning:  you’ll need a pastry bag with a star tip.  I bought a little kit for $5 from Sur la Table–50 disposable pastry bags and 3 plastic tips, including a star tip.  The recipe says to let the doughnuts cool before glazing them.  Truthfully, I think the texture was much better when they were still warm, so I would advise you have the glaze ready to go before you start frying up the doughnuts (just whisk briefly if it starts to harden up).  If your honey has been sitting on the shelf for too long like mine had, 20 seconds or so in the microwave will liquidize it again.  Finally, this recipe is certainly a long process the first time you give it a go, so don’t plan on having these ready before the rest of the household wakes up.  Go into it knowing that and you can have them good to go for a nice brunch.

French Cruller Doughnuts with Maple Vanilla Bean Glaze
Adapted from Doughnuts: Simple and Delicious Recipes to Make at Home via Not So Humble Pie

  • 1 cup water
  • 6 tablespoons butter, cubed
  • 2 teaspoons sugar
  • 1/4 teaspoon salt
  • 1 cup flour, sifted
  • 3 large eggs
  • 2 large egg whites
  • vegetable oil for frying
  • 1 1/2 cups powdered sugar, sifted
  • 1 tablespoon honey
  • 1 teaspoon vanilla bean paste or vanilla extract
  • 3 tablespoons milk
  1. Mix butter, sugar, salt and water in a medium sauce pan and to a rapid boil.
  2. Have a wooden spoon in hand and be ready because this next step goes quickly: add the flour to the pot of boiling mixture, stirring like crazy to make sure the flour is fully incorporated.  It will go from liquid to dough almost instantly.  Keep stirring and mushing it around the bottom of the pot for about 4 to 5 more minutes.  You’re going to get a film coating the bottom of your pot, but it’ll clean up easy later.  Not So Humble Pie pointed out the reasoning is to remove as much moisture as possible so the pastry is lighter than air so cook until there is no steam coming from the pastry any more.
  3. Transfer the pastry to a mixing bowl and beat it with your electric mixer for a minute or so to cool it off, then beat in the eggs one at a time, making sure the egg is completely incorporated before adding the next.
  4. The amount of egg white you add will change with each recipe.  You want to add enough egg white to make the batter glossy (egg white will make the doughnuts light and airy later).  Add too much egg white and the dough will be too soft and the pretty piping won’t hold and your doughnuts will be flat.  Truthfully, I just added both egg whites and didn’t worry about it and my doughnuts ‘wilted’ just a little.
  5. Cut out four 3″ squares of parchment paper (we’ll be reusing them) and lightly grease them.
  6. Heat 2″ of oil to 375 degrees.  Keep your instant thermometer in the oil the whole time so you can keep a close eye on the temperature and keep it as close to 375 as you can.  Also, don’t get impatient and just crank up the heat to get the oil hotter faster–once it reached 375 I turned down the flame, but it kept soaring up past 400 and I just had to wait for it to cool down again.
  7. While the oil is heating, line a table with a stack of paper towels and set out a wire cooling rack.  Also, whip up the glaze by mixing the powdered sugar, vanilla, honey, and adding 3 tablespoons of milk.  If the glaze is not pourable, add one more tablespoon of milk.
  8. Back with the doughnuts, fill a pastry bag fitted with a star tip with the dough and pipe it into a ring shape on each square of greased parchment paper.
  9. Once the oil is hot enough, take one square of paper and gently drop it into the oil, doughnut side down.  The paper will magically unstick and float off the doughnut in just a few seconds; use tongs to pick it up out of the oil and let it drain on the paper towel lined plate.  Fry the dougnut for a few minutes on each side–they should be a deep golden brown color all over.  Transfer completed doughnuts to paper towel lined plate and then over to the cooling rack while you finish the others.
  10. Luckily, you won’t have to grease the squares again, considering they’ve been sitting in a vat of hot oil.  Continue piping rings of doughnut dough onto the squares and frying them until you’re out of dough.
  11. Glaze the doughnuts by flipping them upside down and dipping them in the glaze.  Set them back on the drying rack with some paper towels underneath so that the glaze doesn’t drip all over your table!  Let the glaze dry a little and then enjoy!

Roasted Peaches with Oatmeal Streusel and Creme Anglaise

5 Aug


I don’t think I could have found a simpler, more delicious way to eat my favorite summer fruits (peaches and nectarines), aside from just directly biting into one.  The peaches and streusel alone are fantastic–the warm cinnamon and nutmeg flavors complement the fruit perfectly.  When you add the creme anglaise, though…I don’t know if words can even describe how much I LOVE creme anglaise.  This was my first attempt at making it and, while not perfect, I was eating it straight out of the bowl and had to stop to make sure I would have enough to spoon over the peaches.  The original streusel recipe called for chopped almonds for crunch, but I switched in oatmeal instead–I’m a BIG sucker for oatmeal streusel.  Best of all, the ingredients were all in my fridge and pantry already, so it was a quick treat to whip up.  It’s not overly sweet either, so I may be making it for brunch pretty soon here.  In fact, I’m not even going to talk any more, I just want t
o get right to the recipe:

Roasted Peaches with Oatmeal Streusel and Creme Anglaise
Peaches recipe adapted from Eat Well
Creme Anglaise recipe adapted from Cooks Illustrated, Dec 2006
Serves 2 (Creme Anglaise recipe makes about 2 cups)

  • 2 firm peaches or nectarines
  • 1.5 tablespoons of butter, cut into pieces (plus extra for buttering dish)
  • 3 tablespoons of flour
  • 3 tablespoons of brown sugar
  • 1/4 teaspoon of cinnamon
  • 1/8 teaspoon of nutmeg
  • sprinkle of salt
  • 1/4 cup of oatmeal
  • 1 1/2 teaspoons of vanilla bean paste
  • 1 teaspoon of vanilla extract
  • 1 1/2 cups whole milk
  • 5 large egg yolks
  • 1/4 cup sugar
  • pinch of salt

For the Peaches:

  1. Preheat an oven to 400°F. Lightly butter any baking dish that will accommodate the peaches (I used a glass pyrex).
  2. Cut the peaches in half and remove the pits.  On the round side of the peach, cut a thin slice off  to create a little flat space so that the peaches won’t roll around in the baking sheet.  Arrange them in the dish with the pit side up.
  3. In a food processor, combine the flour, brown sugar, cinnamon, nutmeg and salt.  Add the butter pieces and pulse about 5-10 times until the mixture is crumbles.  A word of warning: I over pulsed mine and accidentally made it into cookie dough.  If this happens, it’s no biggie; it will taste the same.
  4. Stir the oatmeal into the mixture.
  5. Press small handfuls of the mixture onto the tops of the peaches.  Like I said, mine was more like cookie dough, so pinched off bits and pressed them onto the peaches.
  6. Pop the peaches into the oven and bake 20 minutes.  Peaches will be tender and the streusel will be baked and browned.  In the meantime…

For the Creme Anglaise

  1. Warm the milk in a medium sauce pan over low heat until steaming.
  2. In the meantime, whisk yolks, sugar, and salt together in medium bowl about 1 minute until pale yellow in color.
  3. Measure out 1/2 cup of the steaming milk (leave the rest in the pan over the low heat) and, while constantly whisking, slowly pour the 1/2 cup of milk over the egg mixture. (This is called “tempering”, you’re warming up the eggs so they don’t freak out when poured into hot milk and turn immediately into scrambled eggs.)
  4. Pour the warmed egg mixture into the pan of milk and constantly stir the mixture for the next 8-10 minutes.  Using an instant-read thermometer (do you have one yet?  If not, they’re something like $12 at Bed Bath & Beyond; go get one!), keep stirring the milk until it registers 175-180 degrees.  Be patient.  If you turn the heat up, the milk will curdle.  Make sure to keep an eye on the bottom of the pan–be quick to break up any curdled milk that forms along the bottom of the pan because it will make the creme grainy.  I was disappointed, seeing that my creme was turning out super grainy and decided that I would eat it anyway and just not give you guys the recipe until I had figured out what I did wrong but it turns out I had no reason to panic because of the next step here…
  5. Once you reach 175-180 degrees, take the pan off the heat and pour it through a fine mesh strainer.  I was worried I wouldn’t have a strainer fine enough, but just your average mesh strainer will do–it got rid of all the little grains and I had a beautifully smooth Creme Anglaise!

The creme can be refrigerated until you want to use it (put a piece of plastic wrap directly on the surface of the creme so that you don’t get a skin on it later), but I spooned it still warm over the warm peaches.  I thought I was in heaven.  I still have a lot of strawberries left (I’m eating them as fast as I can!) and can’t wait to eat them with some of the creme tonight after dinner.