Archive | Dessert RSS feed for this section

Bourbon Bacon Brownies

7 Oct

I really don’t know if much can be said about these brownies.  Bacon + Bourbon + Brownies = Mad Deliciousness.  They speak for themselves!

While I love a good BLT just as much as the next person, I have to admit that I’m not fully on the bacon train that has chugged through the foodie world (and, thankfully, seems to be on its way out), but this just seemed like a no brainer.  The brownies are soft and fudgy, the nuts are soaked in bourbon, and the bacon is a great crunchy contrast to the brownie texture.

I’ll be spending my weekend at the Hicksville Trailer Park Palace (really) for my good friend’s birthday and I think these fit the bill exactly for properly themed food.  That said, these will be great for any sort of ‘manly’ event, too–bourbon and bacon makes any fancy dessert more Y-chromosome friendly!

Bourbon Bacon Brownies
adapted from Baking Illustrated and SlashFood
Makes one 8″ x 8″ pan, approx 16 brownies

  • 1/2 a package of bacon
  • bourbon, at least a 1/4 cup
  • 1/2 cup chopped pecans
  • 5 oz semisweet or bittersweet chocolate, chopped
  • 2 oz unsweetened chocolate, chopped
  • 8 tbsp. unsalted butter, cut into quarters
  • 3 tbsp. cocoa powder
  • 3 large eggs
  • 1¼ cups sugar
  • 2 tsp. vanilla extract
  • ½ tsp. salt
  • 1 cup all-purpose flour
  1. Place an oven rack in lower-middle position and preheat the oven to 400° F.  Line an 8-inch square baking dish with foil and spray lightly with nonstick cooking spray; set aside, line a rimmed baking sheet with foil.
  2. Set pecans in a small bowl and cover with bourbon, about 1/4 cup, set aside to soak.
  3. Arrange the bacon on the tin-foiled covered rimmed baking sheet and pop into the oven at 400 degrees for about 20 minutes or until golden brown.  When you take it out of the oven, transfer it to a plate lined with 3 or 4 layers of paper towels and blot dry.  The bacon will turn crispy as it cools.  Stack the bacon and slice into 1/4″ wide slices.
  4. In a heatproof bowl set over a pan of barely simmering water, melt the chocolate and butter, stirring occasionally until smooth.  Whisk in the cocoa powder until smooth.  Set aside to cool.
  5. In a medium bowl, combine the eggs, sugar, vanilla and salt; whisk until combined, about 15 seconds.  Whisk in the warm chocolate mixture until incorporated.
  6. Add the flour, 1/2 cup at a time, mixing in gently.
  7. Spoon the nuts out of the bourbon and fold nuts into batter (save bourbon for later).
  8. Pour the mixture into the prepared pan and spread with a spatula to make an even layer; sprinkle bacon slices evenly all over the top of the brownie batter.
  9. Bake until slightly puffed and a toothpick inserted in the center comes out with a small amount of sticky crumbs clinging to it, 35-40 minutes.
  10. Pour reserved bourbon evenly over the top of the hot brownies.  It will soak into the brownies and spread deliciousness all over.
  11. Transfer the pan to a wire rack and let cool to room temperature, about 2 hours.  DIG IN!

Tuxedo Cake

3 Oct

What luck that Shawnda picked such a great cake recipe for the first week of the month for Project Pastry Queen–I’ve started baking treats for the monthly birthday celebration for the office and this was perfect!  My only hope is that I get it to the office without issue, which involves driving up and over a mountain range.  In fact, as you’re reading this, probably right this moment, my office is either enjoying lovely slices of Tuxedo Cake or eating Cake Mush.

The cake was pretty basic to put together: just a normal chocolate cake, whipped cream, and more or less just melted chocolate.  But what a presentation!  It just looks so fantastic, with its stark black and white contrast, that I would have sworn it took a lot more manpower and hours than it really did.  My only two notes are that I’m always afraid of over-whipping the cream so I started off with whipped cream that was too soft (although it did make a nice “crumb coat”, a thin layer of frosting that seals in all the crumbs so you can add another perfectly crumb-less layer of frosting).  The whipped cream is the right consistency when you slap a dollop on the side of the cake and it doesn’t drip right off.  Also, Rebecca (and Shawnda) used Lyle’s Golden Syrup.  I admit again that I substituted what I already had in my cabinet and readily available.  I’m not sure if it was because of this substitution, but my chocolate dripped over the sides perfectly, despite Rebecca’s warning that it might be too thick if you let it cool for too long.

Check out all of the other Project Pastry Queen participants’ takes on the recipe here!

Tuxedo Cake
From Rebecca Rathers’ Pastry Queen

For the cake

  • 1 cup (2 sticks) butter
  • 2 cups water
  • 1 cup canola oil
  • 4 cups sugar
  • 1 cup unsweetened cocoa powder
  • 4 cups all-purpose flour
  • 4 large eggs
  • 1 cup buttermilk
  • 1 Tbsp baking soda
  • 1/2 tsp salt
  • 1 Tbsp vanilla

For the frosting

  • 4 cups chilled heavy whipping cream, well-chilled
  • 1 1/4 cup powdered sugar

For the glaze

  • 4 oz bittersweet chocolate, chopped fine
  • 1/2 cup heavy whipping cream
  • 1/4 cup light corn syrup
  • 2 tsp vanilla

Cake

  1. Preheat the oven to 350 degrees.  Line the bottom of three 9″ cake pans or two 10″ cake pans with parchment paper rounds and butter and flour the pan or spray with non-stick baking spray.
  2. Combine the butter, water, and canola oil in a medium saucepan set over medium heat and let butter melt.
  3. In a large bowl, stir together sugar, cocoa and flour.  Pour the butter mixture into the sugar mixture and whisk until smooth.
  4. Whisk in the eggs, one at a time, then whisk in the buttermilk.  Whisk in the baking soda, salt and vanilla all at once.
  5. Transfer the batter to the prepared pans.  For a 3 layer cake, stagger the cake layers on the oven racks so that no layer is directly over another.  Set two layers on one rack and the third on the other.  Bake 35-40 minutes or until a toothpick inserted in the middle of each layer comes out clean.
  6. Remove the cakes from the oven and cool on racks for about 15 minutes before inverting onto baking racks.  Cool the cakes completely, at least 2 hours, before frosting.

Frosting

  1. Whip the cream in a large bowl on high speed until soft peaks form (when you lift the beaters out and turn them upside down, there should be little peaks on the end of the beaters whose tips fall over quickly).
  2. Add the powdered sugar and whip until stiff peaks form (the peaks will stand tall and not fall over).
  3. Place first layer of cake onto serving plate and top with a layer of frosting.  Add second layer of cake and frosting and last layer of cake and frosting before frosting the sides of the cake with a thick layer of whipped cream.
  4. Put cake in fridge and let frosting set for 1 hour.

Glaze

  1. Place the chopped chocolate in a small bowl.  Heat the cream in a small saucepan until steaming and pour it over the chocolate.  Whisk until chocolate is fully melted.
  2. Stir in the corn syrup and vanilla until fully incorporated and set bowl aside to cool for 10 minutes.
  3. Drizzle the glaze along the top edge of the cake and cover the whole top of the cake with glaze.
  4. Many people finish with strawberries, often covered in chocolate, but strawberry season is just closing here so I decided to forgo them this time–but the next time I make this I will definitely be including them!

Apple Honey Cake

30 Sep

The Jewish New Year is upon us!  The Boyfriend’s family is Jewish and every year I beg to go to Rosh Hashanah and Yom Kippur services with them.  I love the traditions observed and, of course, all of the food.  The best combination of both of those is the Rosh Hashanah tradition of eating honey and apples to symbolize the hope for a sweet year.

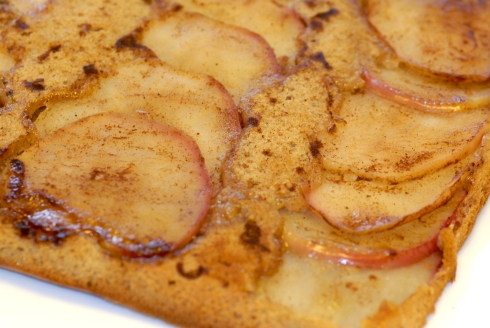
So I rushed home today and grabbed some apples from the grocery store on the way.  I had to be ready to go in 45 minutes and would you believe that I was able to combine the ingredients, bake the cake, let it cool a little and take photos of it all before it was time to leave for Temple?  That should show you how easy and quick it is to throw this delicious little cake together.

Some notes: the cake will end up very thin, since the original recipe called for a smaller cake pan.  I used what I had and actually really liked it thin–it let the apple and honey flavors shine and made for a perfect light dessert instead of a one that makes you feel overly stuffed.  Also, I really suggest using a mandolin slicer for this project.  I got a great handheld OXO mandolin for just about $15 and it’s an amazing tool (slicing pizza toppings– just sayin’).

Happy New Year!  This Apple Honey Cake will guarantee it’s a sweet one.

Apple Honey Cake
Adapted from Taste of Home

  • 1/2 teaspoon ground cinnamon, plus extra for sprinkling
  • 2 Gala apples, very thinly sliced (use a mandolin if you have one)
  • 3 tablespoons butter, softened
  • 1/2 cup packed brown sugar
  • 1 egg
  • 1/3 cup milk
  • 1/2 teaspoon vanilla extract
  • 3/4 cup all-purpose flour
  • 1 teaspoon baking powder
  • 1 tablespoon honey, plus extra for drizzling
  1. Preheat the oven to 350 degrees.
  2. Line an 8″ square baking pan with parchment paper (I forgot to coat the paper with nonstick spray, but it was fine without it, so no big deal if you don’t have any).  Sprinkle cinnamon in a light, even coat across the bottom of the pan.
  3. Arrange apple slices in whatever pattern you want.  I did three rows of 6 overlapping slices, the center row moving the opposite direction.  Fancy!
  4. Cream the butter and brown sugar until crumbly and fluffy, about 2 minutes, beat in egg, then milk and vanilla.
  5. Combine flour, baking powder and cinnamon in a small bowl, then add to butter mixture and beat until combined.
  6. Drizzle honey evenly all over the arranged apples in the pan, as much or as little as you like.  Gently pour the cake batter over the apples and honey and spread until entire bottom of pan is evenly covered.
  7. Bake for about 20 minutes or until a toothpick inserted near the center comes out clean and the apples are soft.
  8. After taking it out of the oven, let the cake cool for 5 minutes or so and invert the cake onto the serving platter.
  9. Serve warm if you can, but no matter what the temperature, definitely serve it with whipped cream!


James and the Giant Bourbon Honey Peach Pie

21 Sep

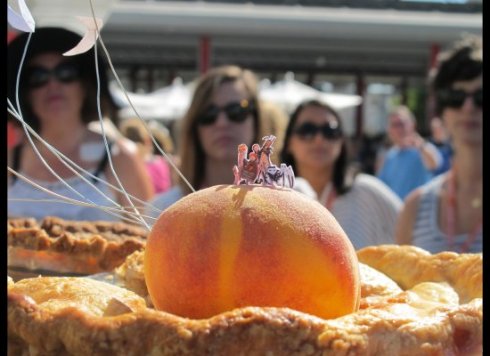
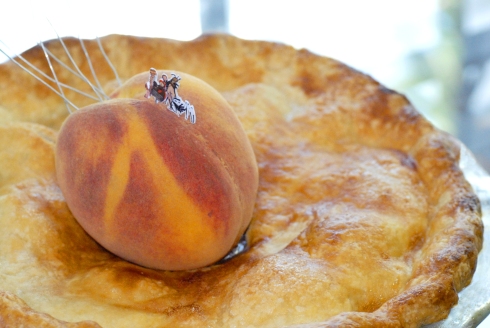
When I saw KCRW & LACMA were holding a pie contest, I was interested.  When I saw that there was a category just for pies inspired by Tim Burton, I was hooked.  I instantly started churning out ideas and sketching them out on scraps of paper….Jack the Pumpkin King Pumpkin Pie, Sweeney Todd “Meat” Pie, the Queen of Hearts’ Strawberry Tarts….the possibilities were endless!  I couldn’t have asked for a more inspiring and creative special category and I was disappointed to find out we could only enter one pie per category.  So instead of disguising my cast-off Tim Burton creations to be suitable for other categories (fruit, nut, savory, or cream/chiffon), I decided to focus all my creative and baking energy to making one really great pie: James and the Giant Peach Pie.

I felt, despite the fact that the judges were a total all-star panel, that pumpkin and strawberry and meat pies are so subjective to a judge’s mood on any given day…but that no one can actually turn down a really good peach pie, no matter what their mood.  Since it was for Tim Burton, I knew I had to go all out on themeing the pie and if there’s one thing I love it’s a challenge that combines baking and crafting.  In “James and the Giant Peach,” the characters live inside a peach floating across the English Channel, at one point being pulled by a large flock of birds.  So I went to the co-op, found the largest peach in the bin, and proudly carried it home, knowing it would be my centerpiece.  I held up the line at FedEx-Kinko’s while the guy at the desk and I printed out the characters in a few different sizes for me to experiment with (and mirror images of them, so no matter what side you looked at the pie from, you wouldn’t be staring at the white back of paper).  And I dashed through the craft store, wondering if I really needed a pair of needle nose pliers and wire cutters to pull off this project (I did).  The final result was a “giant” peach, the cast of characters merrily perched on top, being pulled by birds through waves of the English Channel pie crust.

There were some hurdles to jump first, though.  I admit, though I love making pies, I normally have no patience for pie crust and just use frozen crust from the store (it could be because I make most of my pies around Thanksgiving when I have other things to worry about, like if I remembered the cranberries for the stuffing).  These pies had to be 100% homemade and, truthfully, I’m glad for it, because the process reminded me that crust really is so simple to throw together that I should take the time to do it more often.  The other hurdle was that in order to pull off my design element, I needed a little stand to hold the peach up at crust level and I didn’t know a single pizza store that still used those plastic stands to keep the box from drooping into the cheese.  Imagine my delight when the hero boyfriend called from a conference he was at in San Fransisco to say that he had triumphantly found and saved two pizza box stands and he would be home on Friday with them!

So with all challenges behind me and nothing left to do but bake a pie, I plunged ahead, making the crust on Saturday night and the pie early on Sunday morning, hoping it would cool off enough before having to bring it to LACMA for judging.  And when all that was said and done….

I placed first in the Tim Burton category!  My very first blue ribbon!  I was so nervous seeing my pie up on the judges’ table, but after my name was called, I was absolutely jumping for joy and so proud of what I had accomplished.  The boyfriend had been hiding inside the pie tent so that he could have first dibs at tasting some of the 250 pies entered in the contest, but came out to celebrate with me and join in my first paparazzi moment (after 3 years in LA, it’s about time, eh?).  I’m so grateful to all the friends who showed their support either by coming to the event or just offering moral fortitude for my first baking contest–it certainly paid off!  And now, dear readers, I pass the recipe on to you to share with your family and friends.  Award Winning Bourbon Honey Peach Pie, submitted for your pie-eating pleasure:

Bourbon Honey Peach Pie
adapted from Gourmet, July 2009 via Sassy Radish
crust adapted from Cook’s Illustrated

Pie Crust (enough for 2 crusts, a top and bottom)

  • 2 1/2 cups unbleached all-purpose flour
  • 1 teaspoon table salt
  • 2 tablespoons sugar
  • 12 tablespoons cold unsalted butter, cut into 1/4-inch slices
  • 1/2 cup chilled solid vegetable shortening , cut into 4 pieces
  • 4 tablespoons vodka , cold
  • 4 tablespoons ice water

Filling

  • 3 lb ripe peaches
  • 2 tablespoons cornstarch
  • 1 1/2 tablespoons all-purpose flour
  • 2 teaspoons fresh lemon juice
  • heaping 1/2 teaspoon cinnamon
  • heaping 1/4 teaspoon nutmeg
  • 1/4 teaspoon salt
  • 1/2 cup sugar
  • 1/4 cup honey
  • 2 tbsp bourbon
  • 1 tablespoon vanilla bean paste (or extract)
  • 2 tablespoons water
  • 3 tablespoons unsalted butter
  • 1 egg white
  • sugar for sprinkling
  1. Process 1 1/2 cups flour, salt, and sugar together in food processor until combined, about 2 one-second pulses.
  2. Add butter and shortening and process until homogenous dough just starts to collect in uneven clumps, about 10 seconds (dough will resemble cottage cheese curds with some very small pieces of butter remaining, but there should be no uncoated flour). Scrape down sides and bottom of bowl with rubber spatula and redistribute dough evenly around processor blade.
  3. Add remaining 1 cup flour and pulse until mixture is evenly distributed around bowl and mass of dough has been broken up, 4 to 6 quick pulses. Empty mixture into medium bowl.
  4. Sprinkle vodka and water over mixture. With rubber spatula, use folding motion to mix, pressing down on dough until dough is slightly tacky and sticks together. Flatten dough into 4-inch disk. Wrap in plastic wrap and refrigerate at least 45 minutes or up to 2 days.
  5. Place a foil lined baking sheet on the middle rack in your oven and preheat to 425 degrees.  This will ensure ,when you put the pie in the oven to bake on the already hot sheet, that the butter and shortening will melt and coat the flour faster, before the peach juices get to the flour.  If the butter and shortening melt first, you’ll get a flaky crust.  If the peach juices get to the crust first, you’ll get nothing but a soggy crust.  If you have been chilling your dough overnight, pull it out now so that it can soften.
  6. You can choose to peel the peaches or not.  If you do want to peel them, blanching them will make the process a lot easier.  I personally just didn’t want to take the time to peel them and the pie was, obviously, fine.
  7. Slice the peaches into 8 pieces per fruit, tossing them in a bowl as you go.
  8. Pour the lemon juice over the peaches slices.
  9. In a small bowl, mix the cornstarch, flour, cinnamon, nutmeg, and salt.  Pour the mixture over the peach slices and toss the peaches until evenly coated.
  10. Bring 1/2 cup sugar, honey, vanilla, and bourbon and water to a boil in a 1 1/2- to 2-qt heavy saucepan over medium-high heat, stirring until sugar has dissolved.  Boil without stirring, swirling pan occasionally so the mixture darkens in color evenly, until dark amber, about 5 minutes. (Tricked you!  You’re basically making vanilla honey caramel here!  But we’re not going all the way to caramel, instead we’re just cooking the sugar long enough to deepen the flavors and give it a hint of caramel flavor.)
  11. Remove from heat and add butter, swirling pan until butter is melted. Pour over fruit and toss the peaches until evenly coated.
  12. Sprinkle a generous amount of flour on top of the first dough round and roll out 1 piece of dough into a 13-inch round on a generously floured surface.  Gently roll the dough around the rolling pin and then unroll it into the pie plate, gently lifting the edges and settling it into the plate (at this point it is suggested that you chill the pie plate and crust while you roll out the other crust but truthfully, I was rushing and forgot and it was fine).  Roll out the second pie crust using the same flouring methods.
  13. Spoon (or dump) the peaches into the pie crusted plate and lay the second rolled out crust on top.  Trim the overhand so there’s just about a 1/2 inch left.  Going around the edge, you’ll seal the juices in best if you fold the edge of the crust underneath itself before crimping or decorating it.  Cut a hole about 2″ wide in the center of the top pie crust for steam to vent out.
  14. Brush the crust with the egg white and then sprinkle with sugar.  Both will make the crust shiny and delicious!
  15. Bake pie on hot baking sheet 20 minutes. Reduce oven temperature to 375°F. Continue to bake until crust is golden-brown and filling is bubbling, about 50 minutes more–tent tin foil over the top of the pie if the crust starts to brown too much. Cool pie to room temperature, 3 to 4 hours.

Bananas Foster Shortcakes

19 Sep

First, I want to remind all you faithful readers to follow me on Facebook or Twitter for status updates from me and alerts for new recipe posts!

Now before I dive into this week’s PPQ recipe, I have to bow down and say that Bananas Foster is not mine to lay claim on within my family.  My father and little sister (my only sibling) staked that claim loooong ago.  Dad makes Bananas Foster, often to introduce guests to fine Southern cuisine and, I suspect, to show off a little bit since the process involves flambeing.  My sister started making it soon thereafter, probably also to show off a little bit, but I think mostly just because it’s a delicious recipe that’s really not too hard to do.  So now it’s my turn.  I have to admit that I have been on pins and needles waiting for the chance to choose a recipe for Project Pastry Queen and when it was finally my turn, there really was no other option than to choose this.

After years of other family members flambeing bananas, I had to, once and for all, make Bananas Foster.  Reading this recipe over and over again, one major thing stood out to me–Rebecca doesn’t flambe the bananas.  This is a key component as it caramelizes and deepens the flavors by raising the temperature to a high degree that wouldn’t be attainable by just a pan over a stove burner.  Now that said, I tried and tried and I could not for the life of me get the pan to ignite.  It was still delicious regardless and I didn’t set my hair on fire.

I admit, I made a number of other changes to the recipe as well.  Usually when I am served this dessert, it is served over ice cream (as Rebecca suggests as well) and since you know that it is a requirement of my cooking to forget an ingredient, it wasn’t until making it tonight when I forgot the ice cream, that I realized ice cream is just too sweet for this recipe and my lack of serious sweet tooth.  I used whipped cream instead and I thought it was perfect–finally a Bananas Foster that didn’t give me a sore throat from all the sugar!  I also forgot the banana liqueur, but I kind of didn’t want to pay for a bottle of it anyway, and I think the recipe benefited from the subtle banana flavor instead of in your face banana flavor.  Finally, Rebecca suggests adding pecans to the processor while making the biscuits.  It’s optional, so I opted out, but it got me thinking of another New Orleans classic treat…instead of adding to the biscuits, I roughly chopped the pecans and sprinkled them on top, which added some fantastic crunch and when mixed in with the sauce made it like a praline!

All the other Pastry Queens-In-Training versions of this recipe can be found here, be sure to check them out.

Bananas Foster Shortcakes
The Pastry Queen by Rebecca Rather (with help from Brennan’s)
Serves 8

Biscuits

  • 2 cups flour
  • 2 teaspoons baking powder
  • 1/2 teaspoon salt
  • 1/3 cup granulated sugar
  • 1/2 cup (1 stick) chilled unsalted butter
  • 1 teaspoon vanilla extract
  • 3/4 cup heavy whipping cream
  • sugar for sprinkling

Bananas & Syrup

  • 1 cup (2 sticks) unsalted butter
  • 1 1/2 cups firmly packed brown sugar
  • 1/2 teaspoon ground cinnamon
  • 1/4 cup dark rum
  • 8 barely ripe bananas, sliced into 1/4 inch rounds (a mandolin slicer makes quick work of this)
  • whipped cream
  • 1/3 cup pecans
  1. Turn the oven to 425 degrees.
  2. Combine the flour, baking powder, salt and granulated sugar in a food processor fitted with a metal blade.  Process about 30 seconds.  Cut the butter into 16 pieces and add to the flour mixture.  Pulse about 15 times, until the mixture is crumbly.  Turn on the processor and pour the cream in through the feed tube in a thin, steady stream, until the mixture begins to form a ball.
  3. Remove the dough and place on a flat surface that has been sprinkled with flour.  Gently form the dough into a 1/2 inch thick disk.  Use a 4 inch biscuit cutter, round cookie cutter, or a glass to cut the dough into rounds.  Roll the biscuits in the coarse sugar and set on a piece of parchment paper on a cookie sheet (Rebecca instructs you to use an ungreased cookie sheet, but my shortcakes stuck hard and fast to the sheet.  I was not a happy camper).
  4. Bake for 8-10 minutes until the shortcakes begin to turn golden brown around the edges.  Cool for 5 minutes on the baking sheet, then use a spatula to transfer the biscuits to individual serving plates (or on a cooling rack if you’re not serving them immediately).
  5. While the shortcakes are in the oven, Melt the butter, brown sugar and cinnamon in a large saute pan set over medium-high heat, about 3 minutes.  The mixture should not be heated beyond a simmer; if it begins to boil over, decrease the heat.
  6. Add the rum and sliced bananas to the syrup and simmer for about 5 minutes.
  7. Rebecca suggests splitting the shortcakes but mine did not rise enough to actually split, so I used them as a base instead, and poured spoonfuls of the bananas and syrup over the cakes, topped with whipped cream and chopped pecans.

Peanut Butter Marshmallow Corn Flake Balls

14 Sep

Even though school always starts in August, it never really felt like school until September rolled around.  So now that the kids have definitely been in school for a little while and are into the swing of things, I can’t think of an easier, more delicious snack to whip up for them for their lunch boxes or for after they get home off the big yellow bus.  But I’m a 25 year old girl and, even though I don’t carry a lunch box or ride a big yellow bus, I still will gobble these up like a 5 year old, given the chance.

I don’t know exactly where the recipe came from, but I do remember my mom suddenly making these one day when I was young, saying that she remembered eating them at school when she was a little girl.  Let me tell you, after Mom started making these, I don’t remember Rice Krispie Treats ever making an appearance in the house again.  I dare you to take one bite of these and then tell me if you ever desire a RKT again in the same way that you will desire these.  Why?  One is mostly air and has no flavor save for a little vanilla from the marshmallow.  The other is dense and chewy and full of flavor.

They take 10 minutes to make so just go for it and then you get back to me on those RTK permanently disappearing from your brain, okay?

Peanut Butter Marshmallow Corn Flake Balls
(If anyone can think of a better name for these, tell me.  I’m open to suggestions!)
Makes about 16-20 depending on how big you make them

  • 3 tablespoons butter
  • 1 bag mini marshmallows
  • 1/2 cup peanut butter
  • 6 cups corn flakes
  1. Melt the butter in a large stock pot over medium heat
  2. Dump the marshmallows in and stir with a big wooden spoon until completely melted with no lumps
  3. Add the peanut butter and stir until completely incorporated to the marshmallow
  4. Turn off the burner and add the corn flakes.  Stir until flakes are evenly coated with marshmallow-peanut butter mixture.  Don’t worry about being too gentle and not crushing the corn flakes.  It’s okay if they get crushed and most will stay surprisingly whole (see picture above and I was actually pretty rough in the stirring process).  Be sure there are no pockets of goopy mixture left (I thought I was done stirring and then accidentally came across a few pockets in the pot).
  5. Lay out a sheet of wax paper and butter your hands up.  Taking small handfuls of the mixture out of the pot, roll them up in your hands approximately golf ball sized or a little larger if you prefer.  Be sure to firmly squish them into the ball shape–again, this is no time to be gentle.  The harder you squish them, the chewier they will be later and that is ALWAYS my goal in this matter.  This is a great step to let the kids help with; I have strong memories of Mom mixing the ingredients together and then me and my sister helping to roll the balls up.  Be careful with little hands in the hot mixture.  Most of it will have cooled, but sometimes you just hit a hot spot.  You can avoid this by using a spoon to pull up portions of the mixture so that they can test it or blow on it to cool instead of grabbing a handful of hot stuff.
  6. Let the balls cool before eating (although I can never resist eating a few still warm).  These also freeze wonderfully so make a huge batch and throw them in the freezer for treats.  They are, of course, hard on the jaw right out of the freezer, but once the outside softens up a little, they’re still super crispy on the inside, which is fun, but a mess.

Pineapple Upside-Down Cake

8 Sep

About a month ago, we had a Hawaiian Luau themed luncheon at work.  For it, a coworker bestowed upon me her beloved Grandmother’s secret family recipe for Pineapple Upside-Down Cake.  I was truly honored to be able to make it and I could tell immediately at looking through the ingredients that this cake was something special.  The cake was a big success at the Luau and I couldn’t wait to share the recipe with you except…it’s called “Grandmother’s secret family recipe” for a reason.  I was desperately trying to think of a way to share it, but, really, there must be integrity and honor amongst chefs, right?

I couldn’t leave you with nothing, so I’m including Cooks Illustrated’s Pineapple Upside-Down Cake, since their recipes are usually foolproof.  You’ll still be eating fantastic cake!  (If you promise not to tell anyone, I might suggest you think about adding bit of a three letter alcohol.  It’s not the most secret ingredient and not the one that adds the biggest special taste profile, so I feel okay sharing it).  Please note again, that the cake shown above is not the same recipe as below!  If you want a more traditional looking cake closer to what I made above than what CI suggests, make the caramel sauce, pour it into the cake pans, and arrange the maraschino cherries (first) and pineapple rings (second), then pour the cake batter over them.  Aloha!

Pineapple Upside-Down Cake
Recipe from Cooks Illustrated

Pineapple Topping

  • 1 medium fresh pineapple (about 4 pounds), diced into 1/2 pieces (about 4 cups prepared fruit)
  • 1 cup firmly packed light brown sugar (7 ounces)
  • 3 tablespoons unsalted butter
  • 1/2 teaspoon vanilla extract

Cake

  • 1 1/2 cups unbleached all-purpose flour (7 1/2 ounces)
  • 1 1/2 teaspoons baking powder
  • 1/2 teaspoon table salt
  • 8 tablespoons unsalted butter (1 stick), softened but still cool
  • 3/4 cup granulated sugar (5 1/4 ounces)
  • 1 teaspoon vanilla extract
  • 2 large eggs at room temperature
  • 1 egg white at room temperature
  • 1/3 cup whole milk at room temperature
  1. Lightly spray 9-inch round, 2-inch deep cake pan with nonstick cooking spray; set aside.
  2. For the pineapple topping: Combine pineapple and brown sugar in 10-inch skillet; cook over medium heat, stirring occasionally during first 5 minutes, until pineapple is translucent and has light brown hue, 15 to 18 minutes. Empty fruit and juices into mesh strainer or colander set over medium bowl. Return juices to skillet, leaving pineapple in strainer (you should have about 2 cups cooked fruit). Simmer juices over medium heat until thickened, beginning to darken, and mixture forms large bubbles, 6 to 8 minutes, adding any more juices released by fruit to skillet after about 4 minutes. Off heat, whisk in butter and vanilla; pour caramel mixture into prepared cake pan. Set aside while preparing cake. (Pineapple will continue to release liquid as it sits; do not add this liquid to already-reduced juice mixture.)
  3. For the cake: Adjust oven rack to lower-middle position and heat oven to 350 degrees. Whisk flour, baking powder, and salt in medium bowl; set aside.
  4. In bowl of standing mixer fitted with flat beater, cream butter and sugar at medium-high speed until light and fluffy, 3 to 4 minutes. Reduce speed to medium, add vanilla, and beat to combine; one at a time, add whole eggs then egg white, beating well and scraping down bowl after each addition. Reduce speed to low; add about one-third of flour mixture and beat until incorporated. Add half of milk and beat until incorporated; repeat, adding half of remaining flour mixture and remaining milk, and finish with remaining flour. Give final stir with rubber spatula, scraping bottom and sides of bowl to ensure that batter is combined. Batter will be thick.
  5. To bake: Working quickly, distribute cooked pineapple in cake pan in even layer, gently pressing fruit into caramel. Using rubber spatula, drop mounds of batter over fruit, then spread batter over fruit and to sides of pan. Tap pan lightly against work surface to release any air bubbles. Bake until cake is golden brown and toothpick inserted into center of cake comes out clean, 45 to 50 minutes. Cool 10 minutes on wire rack, then place inverted serving platter over cake pan. Invert cake pan and platter together; lift off cake pan. Cool to room temperature, about 2 hours; then cut into pieces and serve.

Bourbon Pecan Pie Bars

6 Sep


I have to admit, I was extremely hesitant about this week’s chosen recipe for Project Pastry Queen (see everyone’s results delicious results here!).  After all, I have my own secret special recipe for pecan pie and, since I was bringing this into the office for our September birthday celebration, if this recipe was a flop I did NOT want people thinking this was a version of my famous Thanksgiving pie.

But I saw that my fellow PPQ’ers loved the recipe and I decided to go for it and wouldn’t you know that this is a great recipe!  I can definitely say this though: it is RICH.  This recipe has a total of 7 cups of brown sugar in it–one cup in the crust and 6 cups in the filling.  Definitely meant to be eaten in very small portions.  I liked the addition of bourbon to it, though, and am even thinking about tweaking my own pie recipe just a touch to include it.

Just some notes about my little changes to Rebecca’s original recipe: I left out the coconut since the recipe depended on coconut for texture, not flavor, and I’ve never really loved shredded coconut’s texture.  I substituted in an extra 3/4 cup of pecans to make up for any lack of texture in the filling.  I also used strictly whole wheat flour in the crust here.  Truth be told, it was because I was afraid I would run out of white all-purpose flour before finishing my various baking projects for the day and I have to say that I think the whole wheat flour really was a great add.  It gave the crust a sweet nutty flavor that really complimented the filling instead of just being a sweet butter crust to support the filling on top of it.

This recipe makes a huge huge batch of bars, so just beware.  Also, I didn’t have the 12×17 baking dish the recipe calls for so I used my largest and second largest glass baking pans and I actually still had extra crust left over.

Bourbon Pecan Pie Bars
Makes about 2 1/2 dozen bars
Adapted from The Pastry Queen

Crust

  • 1 1/2 cups (3 sticks) unsalted butter at room temperature
  • 1 cup firmly packed brown sugar
  • 4 cups whole wheat flour (white all-purpose flour can be used instead)
  • 1 teaspoon salt

Filling

  • 8 large eggs
  • 6 cups firmly packed brown sugar
  • 1/4 cup bourbon
  • 6 tablespoons unsalted butter, melted
  • 2 tablespoons vanilla extract
  • 1 cup all-purpose flour
  • 1 teaspoon salt
  • 2 3/4 cups pecan halves

To Make Crust

  1. Preheat oven to 350 degrees.  Grease a 12×17″ glass baking pan (or whatever smaller glass pans you have on hand).
  2. Beat butter with an electric mixer in a large bowl on medium speed for 1 minute.  Add the sugar to the butter and beat 1 minute, until fluffy.
  3. Add flour and salt, mix on low speed until evenly incorporated but still crumbly.
  4. Press the mixture evenly over the bottom of the prepared pan(s).  I made sure not to let the crust get over 1/4 of an inch, which is why I had leftover crust mixture even after 2 pans.  I’d rather have more filling than crust in the end, wouldn’t you?
  5. Bake the crust for 15 minutes, until it has darkened to a deep golden brown.
  6. Leave the oven set on 350 degrees while you make the filling.

To Make Filling

  1. Whisk the eggs and sugar in a large bowl until blended.
  2. Stir in the bourbon, butter, vanilla, flour and salt until blended.
  3. Stir in pecan halves.
  4. Pour the filling over the crust(s).
  5. Bake until the center is set and doesn’t wobble anymore, about 25-30 minutes.
  6. Cool thoroughly, at least 30 minutes before cutting.

Between my two different pans, I baked one until it was fully set and one until it was mostly set but still a little jiggly when I took it out.  I preferred the one that was baked longer, as the jiggly one was a bit more oozy and less solid than the ones pictured above.  It’s up to you, though!

Almond Bliss German Chocolate Cake

29 Aug

I’ve always been hesitant to make a German Chocolate Cake because they’re not really my favorite flavor combo for cake and, quite frankly, I don’t think they look very pretty.  This being an assignment for Project Pastry Queen, I plowed ahead, hoping against hope that I would be able to create a cake worthy of posting…and well…here I am, so it all worked out for the best!

Let me start out by saying something Big and Important: this is my new go-to chocolate cake recipe.  I can take or leave the coconut custard icing that makes it an official German Chocolate Cake because it’s just not my favorite type of icing for a cake.  This is no Devil’s Food Cake, but it’s the perfect every day chocolate cake–soft, moist, and full of strong chocolate flavor.  I can’t wait for the next time I need chocolate cupcakes or a cake for a party, because I know I won’t have to scour over recipes and hope that the recipe I choose turns out okay.  If you do like coconut, this is a slightly different filling recipe as it utilizes cream of coconut for an extra punch of flavor and almonds instead of pecans.  I did like it in the end and, while not my favorite, it’s certainly a great recipe to have in your box if you love German Chocolate Cake!

In an interesting tidbit for the morning, Rebecca shared that German Chocolate Cake isn’t actually from the country of Germany, but from Texas and named for the brand name “German” chocolate.  Who knew!

Notes: Again, I left out the chocolate chips.  1 3/4 cups stirred in at the end if you want them.  Rebecca also uses almonds in place of the typical pecans, but I’m sure you can substitute pecans back in if you would prefer.  You’ll need three 9″ cake pans, which was a surprise since I only had 2 pans.  Also, make sure you have plenty of eggs on hand–you’ll need a total of 9!

Almond Bliss German Chocolate Cake
Recipe from The Pastry Queen


Cake

  • 8 oz bittersweet chocolate, chopped into small pieces
  • 1/2 cup boiling water
  • 1 cup (2 sticks) unsalted butter, at room temperature
  • 2 cups sugar
  • 4 large eggs, separated
  • 1 teaspoon baking soda
  • 1 cup buttermilk
  • 2 1/2 cups all purpose flour
  • 1/2 teaspoon salt
  • 1 tablespoon vanilla extract

Custard Icing

  • 1 1/2 cups sliced almonds
  • 1 cup milk
  • 1 1/2 cups sweetened cream of coconut (I found a bottle in the alcohol section next to the rum, since it’s used in pina coladas)
  • 1/2 stick unsalted butter
  • 5 large egg yolks
  • 3/4 cups sugar
  • 3 tablespoons cornstarch
  • 1 1/2 cups sweetened shredded coconut
  1. Place one baking rack 1/3 from the bottom of the oven and the second 2/3 from the bottom.  Preheat the oven to 350 degrees.  Line the bottom of three 9: cake pans with parchment paper rounds, grease with butter and dust with flour.
  2. Place the chopped chocolate into a small bowl and pour the boiling water over the chocolate.  Stir until it is melted completely into a smooth sauce.
  3. In a large bowl, beat butter and sugar on medium for 2 minutes.  Add the egg yolks and beat for another minute.
  4. In a bowl, add the buttermilk and baking soda, stirring until it dissolves.  The buttermilk will gently foam up and double in volume, so be sure your bowl is big enough.
  5. Add half the buttermilk mixture to the butter-sugar-egg yolk mixture, beat on low until incorporated, then add half of the flour, beat, then the rest of the buttermilk and the rest of the flour, beating after each addition.
  6. Using a spatula, stir in the salt, vanilla, and melted chocolate.  (Stir in chocolate chips, if using.)
  7. In a clean medium bowl, beat the egg whites on high speed, until soft peaks form.  Gently fold the egg whites into the chocolate batter.
  8. Spoon the batter evenly into the prepared cake pans.
  9. Staggering the cake pans in the oven, put two on the top rack with lots of space in between, and the third on the bottom rack in the middle.  Bake for 30-35 minutes until an inserted toothpick comes out clean.  Keep an eye on them, as they could rise strangely (mine were most definitely lopsided) or the pans could finish baking at different times.
  10. After coming out of the oven, transfer pan to wire racks and after 5 minutes, take the cakes out of the pans and put them upside down directly on the wire racks (that should help them to even out if they rose unevenly).
  11. While the oven is still hot, spread the almonds evenly onto a rimmed baking sheet and toast the almonds for 5 to 7 minutes until golden brown.
  12. Heat the milk, cream of coconut and butter in a saucepan over medium heat utnil the butter has completely melted.
  13. In a medium bowl, whisk the egg yolks, sugar and cornstarch until smooth.  Pour 1 tablespoon of the hot milk mixture into the whisked egg yolk mixture and whisk until fully incorporated.  Repeat two more times (we’re warming the egg yolks up, “tempering them”, so that when we add them to the milk they don’t immediately curdle up into scrambled eggs).
  14. Slowly pour the tempered yolk mixture into the hot milk mixture, which still is over medium heat, whisking constantly.  Whisk constantly for 7-10 minutes until the mixture thickens and looks spreadable.  This happened at exactly the 7 minute mark for me, but I kept going for a few more minutes just in case.  I would rather have slightly over done frosting than frosting that just dribbled down the sides of the cake!
  15. Stir the shredded coconut and the toasted almonds into the custard mixture.  Let the icing cool for at least 15 minutes.
  16. If your cake layers aren’t exactly even, as mine weren’t, you can take a serrated knife and cut the tops off so that they lay flat when stacked.  Bonus:  the tops you cut off are all yours to eat!
  17. Put one layer of cake on the plate, spread icing on top, and repeat with the other layers–I put the top layer on upside down so that the perfectly flat side was facing up.  It was a prettier surface for laying down icing on.  Do not frost the sides of the cake, and you’ll have a surprisingly beautiful specimen of a German Chocolate Cake!  I think leaving the sides clean goes a long way towards avoiding the sticky gloppy mess you usually see of German Chocolate Cakes.
  18. Rebecca suggests you wrap the cake well if you don’t plan to eat it within 3 hours.  I say, see how long it lasts!

Lemon Cheesecake Cheese Ball

24 Aug

The last of my party recipes for now and, admittedly the second cheesecake recipe in a row, but this one is a great way to have a dessert on the buffet table that takes literally minutes to throw together the night before.  And who doesn’t like cheesecake?  So I think you’ll forgive me for the cheesecake overload this week.  Also, this is a completely different take on cheesecake as it doesn’t have to be dessert–it’s not heavy at all so you can have it as a lightly sweet appetizer on the brunch table or party buffet.

Definitely make this the night before as it needs to chill in the fridge for a few hours first.  Also, make sure that when you’re crushing up the graham cracker crumbs the next day, you’re not rushing to get stuff done before guests arrive–I was (when am I not frantically running around?) and 5 minutes before my guests came, my rolling pin slipped and accidentally flung graham cracker crumbs all over the entire kitchen and the girls showed up to me frantically sweeping up the kitchen floor and counters.

Regardless of the easily avoidable mess, this recipe is practically the opposite of Monday’s recipe–instead of dark strong chocolatey coffee flavors, this one is light and refreshing and perfect for an end of the summer party.

Lemon Cheesecake Cheese Ball
Adapted from Annie’s Eats

  • 10 oz. cream cheese
  • 2½ tbsp. sugar
  • Zest of 1 large lemon
  • 4 tsp. freshly squeezed lemon juice
  • 3 graham crackers
  1. Mix cream cheese and sugar together–though it will be more like mushing together and less like stirring.
  2. Mix in lemon zest and lemon juice
  3. Place a piece of plastic wrap on the counter and spoon the mixture into a little heap in the center.  Fold the wrap over the mound and shape the mixture into a ball shape.
  4. Refrigerate for at least 3 hours, overnight is fine and reshape if necessary when you pull it out.
  5. Crush the graham crackers into fine crumbs and roll the ball in the crumbs until evenly coated.  If necessary, take pinches of the crumbs and gently press them in to any spots that look a little bare.
  6. Serve with sliced fruits (I liked it with green apples and nectarines) and, my personal favorite, Nilla Wafers.