Archive | Party Food RSS feed for this section

Maple Vanilla Nut Clusters

12 Oct

I absolutely love recipes like this: easy to make, easy to clean up, perfect to whip up for a group of friends and DELICIOUS.  I already have a spiced nut recipe that I swear by, but this recipe is a game changer.  I will definitely be turning to this one when I want something a little sweeter.  I added extra pecans to the recipe since I find it hard to believe you can have too many pecans but left the amount of glaze the same and I think it turned out fantastic.

These will be great to throw together before any Fall parties you may have coming up!  And, if you’re like me and planning your Thanksgiving menu already, these would be wonderful to make a few days ahead and have sitting on the coffee table for your guests to munch on while waiting for the big event.

Maple Vanilla Nut Clusters
Slightly adapted from Pinch of Yum

  • 1 cup whole raw almonds
  • 3/4 cup chopped raw pecans
  • 1 tablespoon salted butter
  • 1 tsp vanilla bean paste or vanilla extract
  • 1 tsp maple syrup
  • 1 tbs water
  • 1/4 sugar
  1. Toast nuts in a nonstick skillet over medium heat, stirring occasionally, about 5 minutes
  2. Combine water, vanilla, maple syrup and sugar
  3. Add butter and sugar mixture to toasted nuts. Continue to heat over medium, stirring constantly, until the mixture is sticky and no longer runny (about 3 minutes)
  4. Remove from heat and spread the nuts around in the skillet.  Let sit for at least 1 hour in the pan or until cool and hardened

Lindsay, of Pinch of Yum, points out that the flavors really develop overnight, so it’s best not to chow down on it all immediately…but chow down the next day, for sure!

Bourbon Bacon Brownies

7 Oct

I really don’t know if much can be said about these brownies.  Bacon + Bourbon + Brownies = Mad Deliciousness.  They speak for themselves!

While I love a good BLT just as much as the next person, I have to admit that I’m not fully on the bacon train that has chugged through the foodie world (and, thankfully, seems to be on its way out), but this just seemed like a no brainer.  The brownies are soft and fudgy, the nuts are soaked in bourbon, and the bacon is a great crunchy contrast to the brownie texture.

I’ll be spending my weekend at the Hicksville Trailer Park Palace (really) for my good friend’s birthday and I think these fit the bill exactly for properly themed food.  That said, these will be great for any sort of ‘manly’ event, too–bourbon and bacon makes any fancy dessert more Y-chromosome friendly!

Bourbon Bacon Brownies
adapted from Baking Illustrated and SlashFood
Makes one 8″ x 8″ pan, approx 16 brownies

  • 1/2 a package of bacon
  • bourbon, at least a 1/4 cup
  • 1/2 cup chopped pecans
  • 5 oz semisweet or bittersweet chocolate, chopped
  • 2 oz unsweetened chocolate, chopped
  • 8 tbsp. unsalted butter, cut into quarters
  • 3 tbsp. cocoa powder
  • 3 large eggs
  • 1¼ cups sugar
  • 2 tsp. vanilla extract
  • ½ tsp. salt
  • 1 cup all-purpose flour
  1. Place an oven rack in lower-middle position and preheat the oven to 400° F.  Line an 8-inch square baking dish with foil and spray lightly with nonstick cooking spray; set aside, line a rimmed baking sheet with foil.
  2. Set pecans in a small bowl and cover with bourbon, about 1/4 cup, set aside to soak.
  3. Arrange the bacon on the tin-foiled covered rimmed baking sheet and pop into the oven at 400 degrees for about 20 minutes or until golden brown.  When you take it out of the oven, transfer it to a plate lined with 3 or 4 layers of paper towels and blot dry.  The bacon will turn crispy as it cools.  Stack the bacon and slice into 1/4″ wide slices.
  4. In a heatproof bowl set over a pan of barely simmering water, melt the chocolate and butter, stirring occasionally until smooth.  Whisk in the cocoa powder until smooth.  Set aside to cool.
  5. In a medium bowl, combine the eggs, sugar, vanilla and salt; whisk until combined, about 15 seconds.  Whisk in the warm chocolate mixture until incorporated.
  6. Add the flour, 1/2 cup at a time, mixing in gently.
  7. Spoon the nuts out of the bourbon and fold nuts into batter (save bourbon for later).
  8. Pour the mixture into the prepared pan and spread with a spatula to make an even layer; sprinkle bacon slices evenly all over the top of the brownie batter.
  9. Bake until slightly puffed and a toothpick inserted in the center comes out with a small amount of sticky crumbs clinging to it, 35-40 minutes.
  10. Pour reserved bourbon evenly over the top of the hot brownies.  It will soak into the brownies and spread deliciousness all over.
  11. Transfer the pan to a wire rack and let cool to room temperature, about 2 hours.  DIG IN!

Lemon Cheesecake Cheese Ball

24 Aug

The last of my party recipes for now and, admittedly the second cheesecake recipe in a row, but this one is a great way to have a dessert on the buffet table that takes literally minutes to throw together the night before.  And who doesn’t like cheesecake?  So I think you’ll forgive me for the cheesecake overload this week.  Also, this is a completely different take on cheesecake as it doesn’t have to be dessert–it’s not heavy at all so you can have it as a lightly sweet appetizer on the brunch table or party buffet.

Definitely make this the night before as it needs to chill in the fridge for a few hours first.  Also, make sure that when you’re crushing up the graham cracker crumbs the next day, you’re not rushing to get stuff done before guests arrive–I was (when am I not frantically running around?) and 5 minutes before my guests came, my rolling pin slipped and accidentally flung graham cracker crumbs all over the entire kitchen and the girls showed up to me frantically sweeping up the kitchen floor and counters.

Regardless of the easily avoidable mess, this recipe is practically the opposite of Monday’s recipe–instead of dark strong chocolatey coffee flavors, this one is light and refreshing and perfect for an end of the summer party.

Lemon Cheesecake Cheese Ball
Adapted from Annie’s Eats

  • 10 oz. cream cheese
  • 2½ tbsp. sugar
  • Zest of 1 large lemon
  • 4 tsp. freshly squeezed lemon juice
  • 3 graham crackers
  1. Mix cream cheese and sugar together–though it will be more like mushing together and less like stirring.
  2. Mix in lemon zest and lemon juice
  3. Place a piece of plastic wrap on the counter and spoon the mixture into a little heap in the center.  Fold the wrap over the mound and shape the mixture into a ball shape.
  4. Refrigerate for at least 3 hours, overnight is fine and reshape if necessary when you pull it out.
  5. Crush the graham crackers into fine crumbs and roll the ball in the crumbs until evenly coated.  If necessary, take pinches of the crumbs and gently press them in to any spots that look a little bare.
  6. Serve with sliced fruits (I liked it with green apples and nectarines) and, my personal favorite, Nilla Wafers.

Cappuccino Cheesecakes

22 Aug

First, a short programming note–my apologies for the missing post on Friday!  I was out of town and had set up a post to automatically publish on Friday morning but I missed a button somewhere and it didn’t get posted for you.  I’ll save it for later this week!  And on to our regularly scheduled programming…

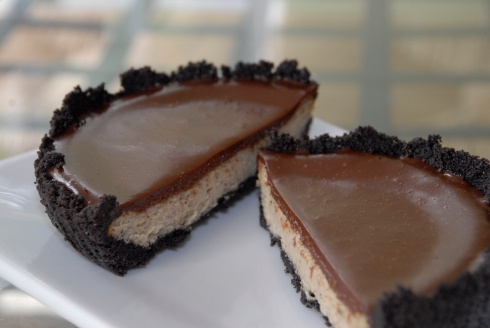
Another entry for Project Pastry Queen, this is without a doubt my favorite recipe from the cookbook so far and possibly my new favorite cheesecake recipe. Granted, I’d never made cheesecake before this recipe, but I think these individual cheesecakes are perfect in every way. They’re small enough that you have automatic portion control. They’re not giant thick layers of cheesecake, but instead surprisingly thin–and surprisingly, the perfect amount. You’ll find yourself satisfied but without indulging in the thousands of calories you might with a normal sized slice. The crust is crunchy, chocolatey, and buttery and is in perfect ratio to the filling. You can’t beat the cappuccino-chocolate flavor combination and the silky chocolate ganache on top is just to die for!

Long story short: do not pass go, do not collect $200. Go directly to the kitchen and make these cheesecakes!

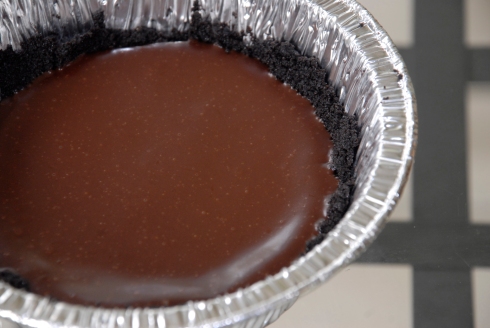
Note: I went to a few different fancy food stores looking for the tins for this recipe before finding exactly what I needed at my local big grocery store.  The tins you want are just the cheap aluminum foil pans, about 5″ across.  The ones I found came in a pack of 3, with big clear plastic lids for each tin (VERY handy for transporting to work the next day for our picnic!) and were labeled “pot pie pans”. 

Also, my true confession for this week from yours truly: I don’t actually like chocolate chips in desserts unless they’re melted and gooey in chocolate chip cookies.  Even then, I go for the cookies with fewer chips.  As such, I left the chocolate chips called for in this recipe and didn’t miss them one bit.  I think they would have interfered with the rich, smooth texture and the ganache more than makes up for any potential lack of chocolate. If you want to add them, stir 1 cup of semi-sweet chocolate chips into the filling batter just before baking.
Cappuccino Cheesecakes
Makes 8 Individual Cheesecakes
Adapted from The Pastry Queen

Crust

  • 1 package (16 oz) Oreos
  • 1 stick (1/2 cup) unsalted butter, melted

Filling

  • 2 teaspoons instant espresso powder
  • 1 tablespoon boiling water
  • 2 packages (8 oz) cream cheese, at room temperature
  • 1 cup sugar
  • 1/4 teaspoon salt
  • 3 large eggs

Ganache

  • 4 oz bittersweet chocolate (my suggestion: 1 bar of Ghiradelli)
  • 1/2 cup heavy whipping cream
  • 2 tablespoons light corn syrup
  • 1 teaspoon vanilla extract
  1. Preheat oven to 350 degrees.  Put the cookies in a food processor and pulse until all the cookies are now just crumbs.  Pour the melted butter in and pulse until butter is fully combined.
  2. Press the cookie-butter mixture into the bottom and about an inch up the sides of the pans.  There should be just enough cookie mixture for the 8 tins.  Set tins aside.
  3. In a small bowl, combine espresso powder with the boiling water and mix.
  4. In a large bowl and using an electric mixer, combine the cream cheese, sugar, salt and coffee mixture.  Add the eggs all at once and beat on medium about 1 minute.
  5. Pour the cream cheese mixture over the chocolate crusts.  I think I used a 1/3 measuring cup and did a scoop of batter for each tin.  You want to leave just a little space between the top of the batter and the top of the crust because you need room for the ganache to sit on top later.
  6. Bake the cakes for 35 minutes until the filling is set.  Cool for 20 minutes while you make the ganache.
  7. Now I’m going to tell you a story right here in the middle of the instructions.  There once was an impatient baker named Emily, who ruined her ganache at 10:30 at night and had to go buy another chocolate bar to finish her recipe before taking it to work the next morning for a picnic.  Do not be as impatient as Emily!  Basically, I thought I knew what I was doing, heated the milk too hot and dumped the chocolate into the milk instead of what the instructions said.  I ended up with a clumpy greasy mess instead of the silky gorgeous ganache I was supposed to have.  Second try was beautiful, because I followed the instructions.
  8. Chop the chocolate into small pieces and put them in a medium bowl.
  9. Heat the cream in a small sauce pan until it is hot and just beginning to steam.
  10. Pour the hot cream over the chocolate in the bowl and stir until it is completely melted.
  11. Stir in corn syrup and vanilla.  Let cool for a few minutes.
  12. Using a normal spoon, I carefully poured a couple of spoonfuls of ganache over each cheesecake.  Gently tilt the tins back and forth and around to make sure the ganache spreads and covers the whole top so that no cheesecake is showing through the top or around the edges.
  13. Refrigerate for at least 4 hours or up to 3 days.
  14. You can pop the cheesecakes out of their tins to serve or, as I did, cut them into 4 wedges and let people take a wedge as they please.

Rather Sweet Sangria

15 Aug

For those who missed my post on Blueberry Pie Bars, I’ve joined Project Pastry Queen–a group of wonderful food bloggers who are baking their way through The Pastry Queen by Rebecca Rather.  We’ll post the results of the week’s recipe and this week we were assigned Rebecca’s Rather Sweet Sangria.  “Rather Sweet” is the name of her bakery & cafe in Texas, hence the name of the beverage.  Not your average sorority house sangria, this is a more adult version that leaves out the floating fruit on top (I’m allergic to apples so I can’t drink that kind anyway) and adds brandy for an extra kick.

Of course, I’m not going to make a whole huge batch of sangria and sit at home by myself on a Friday night and drink it on my own–no, that’s where girlfriends come in.  I split the recipe and made one half with the suggested red wine and one with white wine.  Even between 6 of us, we didn’t come close to finishing either batch, so I highly suggest just doing a half recipe unless you have a big party coming up.

That said, we certainly were refreshing glasses the whole evening, so I know the ladies enjoyed it!  It was a touch too sweet for me, but no one else thought so, so keep it in mind when making it to sweeten it to your own taste.

Some notes:  To sample both red and white sangrias, I split the below recipe equally into two bowls and added 1/2 a bottle of red wine to one bowl and 1/2 a bottle of of white wine to the other.  Be sure to start well ahead of time–you have to make the simple syrup first, which is super super easy, but takes 30 minutes plus cooling time.  The original recipe adds pomegranate seeds, which I left out.  Finally, I was apprehensive about having to do this recipe because who has ever seen pomegranate molasses at the store?  I was absolutely shocked to be casually wandering around my local Italian market, waiting for the boyfriend to pay for a sandwich and not actually paying attention to my surroundings, to look down and see a bottle of pomegranate molasses on the shelf (Rebecca’s suggested brand “Indo-European”, no less!).  If it’s that easy for me, it’s got to be easy for you!

Rather Sweet Sangria
From The Pastry Queen

Simple Syrup

  • 2 cups water
  • 1 3/4 cups sugar
  • 1 lime, halved
  • 1 lemon, halved
  1. Simmer the water, sugar, lemon and lime in a saucepan for 30 minutes
  2. After 30 minutes, remove from heat and cool for another 30 minutes
  3. Squeeze the juice from the lemon and lime halves into the syrup and refrigerate until needed

Sangria

  • 1 bottle fruity red Spanish wine or 1 bottle fruity white wine (I used a Sauvignon Blanc)
  • 2 cups brandy
  • 1 tablespoon pomegranate molasses
  • juice from 1 lime
  • 2 bottles (16.9 oz) chilled sparkling water (or 1 bottle, 33 oz)
  • 1 lime sliced
  1. Combine the wine, brandy, pomegranate molasses, lime juice, and sparkling water in a large bowl and mix.  The recipe calls for 2 cups of simple syrup to be added, but as I mentioned, it was awfully sweet for me, so start with 1/2 cup and add more until it is to your liking, up to 2 cups.  Add the lime slices.
  2. If you are not serving immediately, refrigerate the mixture until ready to serve, but hold off on adding the sparkling water, simple syrup and lime slices until the last minute.
  3. Serve over ice and enjoy!  The sangria will keep in the fridge for a week but it will get progressively sweeter the longer it sits.  You will have to thin it down with some more sparkling water (about 1 cup) to dilute the sweetness and add some carbonation back in.

Roasted Red Pepper Dip

12 Aug

I’m having a few friends over tonight to enjoy the beach air and a movie so this is the first of a handful of quick & easy party recipes I have stored up my sleeve for you lovely people.

On any night, my favorite bar food is roasted red pepper dip.  It’s even better as an appetizer at home because when you’re stressing about party planning, this dip takes literally minutes, minimal dishes to clean up later, and then voila!  One less thing on your mind to worry about.

This recipe in particular has just a hint of dairy in it to give it richness and a smooth texture without overdoing it, yet the roasted pepper flavor is still the star.  As you know by now, I am a garlic lover, so you may want to reduce the recipe to just one clove if you’re not so inclined to super garlicky recipes.

Roasted Red Pepper Dip
Adapted from Smitten Kitchen

  • one 15 oz can of white cannelini beans, drained
  • 1 jar roasted red peppers, drained
  • 3 oz cream cheese
  • 2 cloves of garlic
  • 1/4 teaspoon paprika
  • 1/4 teaspoon salt
  • juice from 1/2 of a lemon
  1. Put all ingredients in a food processor or blender.
  2. Blend.
  3. Serve with pita chips or sliced veggies.

Even simpler than whipping this up the day of the party is whipping it up the night before! I promise you can throw this together during a commercial break on tv and go to sleep knowing it’s one less thing you have to accomplish the next day.