Archive | Savory RSS feed for this section

Taco Salad

24 Oct

And thus another week begins which means another recipe for Project Pastry Queen!  This week Amanda chose Ground Beef Gorditas and, as you can probably tell from the picture above, I didn’t have the time to a) find masa dough and b) pan fry and then also deep fry the gorditas.  It did give me the chance, however, to try a new little technique for taco shell bowls that I’d been wanting to try that involved healthier baking instead of deep-frying.

I remember once standing in the middle of the grocery store having a minor disagreement with The Boyfriend: I had grown up with packaged taco seasoning and wanted to buy some for the tacos we were having that night; he insisted that I could probably make seasoning myself that was better tasting and, likely healthier, since it wouldn’t have all the sodium and other random chemicals found in that stuff.  I appreciate his confidence in me, but at that point in time I was sure nothing I attempted to create was going to taste as good as what I was familiar with.  I’ve since become more confident in myself as a cook, and this recipe was just the one I needed to figure out exactly what was needed in good taco meat seasoning (and I even added a little to it myself!).  Since I was making more of a taco salad, I left the tomato sauce out of the meat recipe–there’s nothing worse than soupy salad, but other than that, I think this is a winner for taco seasoning and I’m pleased to say that I won’t be buying the packaged kind ever again!

Taco Salad
Adapted from The Pastry Queen
Serves 2-3

  • 1 lb lean ground beef
  • 1 tablespoon finely chopped yellow onion
  • 3 cloves of garlic, minced
  • 1/2 teaspoon salt
  • 1/2 teaspoon ground cumin
  • 1/2 teaspoon chili powder
  • 1/2 teaspoon fresh ground pepper
  • 1 tablespoon hot sauce
  • 1 medium sized flour tortilla per person (I used Mission brand “Homestyle” tortillas)
  • 1 head romaine lettuce
  • 1 chopped tomato
  • shredded cheese
  • salsa
  • 1 sliced avocado
  • any other toppings you usually enjoy (sour cream, olives, queso fresco, etc etc)
  1. Preheat oven to 350 degrees
  2. In a large skillet, saute the beef and onion until browned, approx 10 minutes
  3. In the meantime, brush tortillas with water and microwave in a stack for 1 minute.  Drape each tortilla over an upside-down oven-safe cereal bowl and press it so that it molds to the shape of the bowl.  Place bowls on a baking sheet and bake in oven for 10 minutes, until stiff.  Pull sheet out of oven, let cool for a few minutes, then take the molded tortillas off the bowls and let the inside dry out for a few minutes.
  4. Drain off the fat from the ground beef, then add the garlic, salt, cumin, chili powder, pepper, and hot sauce to the beef, cook for another 5 minutes.
  5. Assemble the taco salad by first putting lettuce into the tortilla bowl, then topping with meat and other toppings of your choice.  Enjoy!

Rosemary Potato Pizza

21 Oct

This pizza has been haunting me for months and months–it combines so many of my favorite things, how am I supposed to resist it??  This is definitely a meal idea you want to keep on hand because it’s fast, delicious, and uses ingredients that you’ll likely already have (and if not, it’s just a quick run to Trader Joe’s).  I’m not sure which part I like best–the rosemary (my favorite herb), the mozzarella (which is light and not too much), the creamy potatoes or the crispy chewy crust.

This was also the first time I tried a secret trick to get a crispy pizza crust without a pizza stone…and wouldn’t ya know, it worked!  By putting the baking sheet into the oven ahead of time, while the oven is heating up, it helps the bottom of the crust crisp up while the top bakes normally–it was perfect!  I admit I didn’t make the crust dough myself, but I think sometimes it’s more important to get healthy, stress-free food into you than making EVERYthing handmade and, besides, Trader Joe’s refrigerated pizza dough is delicious!

Rosemary Potato Pizza
Adapted from Stone Soup via Elephantine

  • refrigerated pre-made pizza crust (Trader Joe’s suggested – you’ll find it near the pre-made salads, it should make about 3 decent sized pizzas or 4 slightly smaller pizzas)
  • 1 small-medium red potato per pizza
  • 1 sprig rosemary per pizza
  • 1-2 small balls of fresh mozzarella (the kind floating in water)
  • olive oil for drizzling
  • salt for sprinkling
  1. Preheat the oven to 450 and place a lightly oiled baking sheet in oven as it warms
  2. Divide the dough into the number of pizzas you want and gently stretch dough into thin rounds, leave on counter workspace while you prepare the other ingredients
  3. Slice the potatoes extremely thinly (this is another job the mandolin slicer came in very handy for) and slice the mozzarella balls as thinly as they can go, likely 1/8″ – 1/4″ thick.
  4. Once the oven is preheated, using oven mitts, take the hot baking sheet out of the oven and place on a safe surface.  Transfer the dough rounds to the hot baking sheet (you may have to bake in batches) and brush olive oil over the raw dough.  Arrange the potato slices in a single layer, slightly overlapping, sprinkle rosemary leaves over the pizza, arrange the mozzarella bits and drizzle with a second round of olive oil.
  5. Put sheet with pizzas back into oven and bake for 10 minutes or until the cheese and crust are just starting to brown.
  6. Sprinkle with salt to taste.  Enjoy hot out of the oven!

King Ranch Casserole

12 Sep

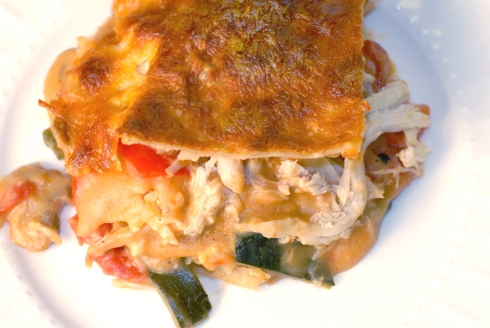
Out of all of the recipes I’ve made for Project Pastry Queen, this is by far the most “Texan”.  Full of southwestern flavors, this is an extremely hearty casserole!  I admit I don’t love corn tortillas, so already this recipe was at a disadvantage in terms of going into my permanent recipe box, but the flavors all even out quite nicely and, while not my favorite PPQ recipe, it’s certainly one to pull out when your Texas relatives come to visit.

In typical Emily-fashion, I had a few forehead slapping moments.  I try to do my food shopping economically but also locally & organic when I can which means that I ended up going to three different grocery stores (which was not my intention).  Most of my basic ingredients came from Trader Joe’s, because they have the best prices, the local food co-op (appropriately called “The Co-op”) for my veggies, but then I still had to go to Von’s to get the poblano peppers because the co-op strangely enough had no chile peppers whatsoever.  So I’m happily cooking away and I’m to the part of the recipe where I start assembling the casserole when I realize with a jump–this is a chicken casserole…I didn’t buy any chicken today!  I blame it on the way the recipe is worded and arranged, since I didn’t make my own chicken stock, but in the end I can’t believe I didn’t put 2 and 2 together and remember to actually buy chicken.  All’s well that ends well.  I’m just glad I live only 2 blocks from the supermarket.

The whole roasting poblano peppers routine may seem really tedious, but I promise, learn now because one of my favorite recipes ever (and I mean EVER) uses roasted poblano peppers and you’ll be glad you have the technique down when I finally post it.

Also, I’ve been very slowly working towards liking mushrooms.  It’s an uphill battle, for sure, but I think that smelling the mushrooms simmering in butter was a turning point for me.  They smelled truly delicious.

Interesting Fact: this recipe is named for one of the biggest ranches in Texas but….it’s a ranch, which means beef, not chicken.  The ranch is just as confused you probably are about why the casserole got named after them.

Update: I have to say that while I wasn’t the biggest fan of this recipe at first, I’m loving the leftovers!  I think the flavors just needed time to meld in the fridge overnight.  This Home Plate‘s version for PPQ looks delicious with sides of salad and black beans–I know what I’m adding to my plate tomorrow night with the last bit of casserole!

King Ranch Casserole
The Pastry Queen by Rebecca Rather
10-12 servings

  • 1 roasted chicken, meat shredded
  • 3 poblano chiles, roasted and diced (Rebecca suggests New Mexican green chiles, but they’re pretty difficult to find)
  • 1/2 cup (1 stick) unsalted butter
  • 1 medium yellow onion, chopped
  • 8 oz button mushrooms, sliced
  • 4 cloves garlic, minced
  • 1/2 teaspoon chili powder
  • 1/4 teaspoon cayenne
  • 1 teaspoon salt
  • 1 teaspoon freshly ground black pepper
  • 1 cup all purpose flour
  • 3 1/2 cups chicken stock
  • 1/2 cup heavy cream
  • 1 can (10 oz) diced tomatoes
  • 18 corn tortillas
  • 1 cup shredded Monterey Jack cheese
  • 1 cup shredded sharp Cheddar cheese (or do what I did and buy a bag of pre-shredded Mexican mix cheese which includes both Monterey Jack and Cheddar and is half the price of buying two blocks of the cheeses and shredding yourself)
  1. Roasting the Peppers: Turn the oven to broil and while that’s heating up, slice the poblano peppers in half, clean them of stems, seeds, and ribbing, then lay the pieces on a cookie sheet, skin side up.  They should lay as flat as possible–just squish them.  Slide the cookie sheet under the broiler element as close as it can go.  In my oven, there’s a little drawer in the bottom so I can slide them right up underneath the flame.  You want the skin to turn black and bubbly, which in this case doesn’t mean it’s burned, but instead means less work for you.  You really do want every inch of that skin bubbly because if it’s not, it just means you’ll have to put the peppers back in the oven (so leave it on after you take the peppers out, just in case).  Leave the peppers under the broiler for about 5 minutes.  When you pull them out, put them in a paper bag so they can sweat for 5 minutes.  Pull them out (they’ll be cool) and peel the skin off the peppers.  If you leave the skin on, it’s kind of like finding pieces of plastic wrap in your food.  The skin will come off pretty easily.  If there is still skin that won’t come off, just slice that part of the pepper off and put it back under the broiler for another 5 minutes.
  2. Making the Filling: Melt the butter in a large saute pan over medium heat.  Add the onion, bell pepper, mushrooms and garlic.  Saute on medium-low heat about 7 minutes, stirring occasionally.  Stir in the chili powder, cayenne, salt and pepper and cook for 1 minute.  Sprinkle the flour in the pan, 1/2 cup at a time, and stir until the white of the flour is no longer visible (I doubted it but it happens, I promise).  Whisk in 3 cups of chicken stock, 1 cup at a time, whisking until smooth after each addition.  Whisk in the cream and stir in the diced roasted chiles.  Add the tomatoes (juice and all).  The cream sauce will be nice and thick.
  3. Assembling the Casserole: Place 1/2 cup of chicken stock in a wide bowl so that you can lay 6 tortillas in the bowl flat and covered with the chicken stock.  Wait a few minutes while you get everything else ready.  Preheat the oven to 350 degrees and grease a 9×13″ baking dish with butter.  Line the bottom of the baking dish with tortillas.  Rebecca suggests 6 per layer, saying that a thick layer of tortillas means it will be easier to cook, but I used fewer since I don’t like corn tortillas.  (Put the next 6 tortillas in the bowl of chicken stock.)  Cover the tortillas with half of the cream sauce.  Add half the chicken and sprinkle with 1/3 of the cheese.  Add a second layer of soaked tortillas (and put the last tortillas in the bowl to soak), the remaining cream sauce and chicken and another layer of cheese.  Top with the last layer of tortillas and sprinkle the rest of the cheese on top.
  4. Bake the casserole for 45 minutes until hot, bubbling, and lightly browned on top.  Remove the casserole from the oven and let sit about 10 minutes before cutting into squares and serve.

Caprese Burgers

2 Sep

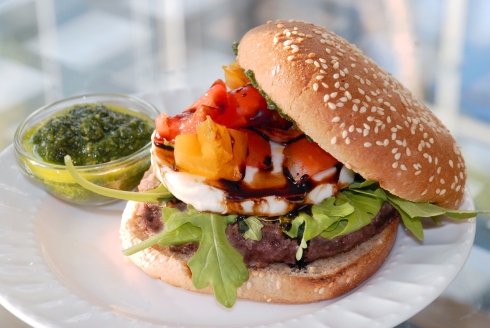
So the boyfriend and I desperately needed a night out.  The solution?  The Counter, a fantastic build-your-own-burger joint, has the best Tuesday night dinner around.  For the price of one of their normal burgers, you get 4 mini burgers designed specially by the chef and 4 mini beer pairings.  The fact that you don’t have to choose just one meal and get 4 very different burgers AND 4 different beers is just phenomenal.  This week the chef created a bacon cheeseburger with potato chips (as a burger topping) and stone ground mustard, a burger with blue cheese, celery slices and buffalo sauce, a southwest burger with corn & black bean salsa, chipotle aioli and fried jalapeno slices and….a caprese burger.

I carefully took only one bite of burger and one sip of the matching beer before moving on to the next, moving in a slow circle around the plate.  And even though I enjoyed all of the burgers immensely, this caprese burger was something special.  It was one of those things where you hit yourself over the head and say “why didn’t I think of this?!”  It was so good, in fact, that after only one bite, I borrowed the boyfriend’s fancy phone to email myself the list of ingredients.  It was so good that the very next day I found myself hungrily craving a full size caprese burger and, let me tell you, when I get a craving like this, it HAUNTS me.  So there was nothing else to do but recreate the burger at home and have caprese burgers two nights in a row.  These are so easy to throw together yet look so impressive that I can’t wait to make them for friends–great for this weekend’s last ditch effort at holding on to summer, Labor Day!  So with out further ado…

Caprese Burgers
Serves 4
Inspired by a Mix-It-Up special from The Counter

  • 4 burger patties
  • 4 hamburger buns
  • arugula
  • 2 tomatoes, chopped (I used heirloom tomatoes, since it’s just barely still summertime)
  • fresh mozzarella, sliced into 1/2 inch thick slices (will come in a single ball the size of a baseball)
  • 1 recipe balsamic reduction (see below)
  • 1 recipe pesto spread (see below)

Balsamic Reduction

  • 1/2 cup balsamic vinegar
  • 1 tablespoon brown sugar

Pesto Spread

  • 2-3 packed cups fresh basil leaves (1 large box of basil from Trader Joes is only $1.99 and is the perfect amount!)
  • 3-4 cloves of garlic
  • 7 tablespoons olive oil
  • pinch of salt
  1. Bring the balsamic vinegar to a boil in a small saucepan.  Once boiling, turn the heat down to medium and let it continue to simmer for about 10 minutes.  Add the brown sugar and stir until dissolved.  Turn heat off to let it cool until your burgers are ready.  The vinegar will turn very thick and should coat the back of a spoon.
  2. In a food processor, combine the basil, garlic, salt and olive oil and pulse until you have a fine paste.  Set aside until ready to use.
  3. Turn your oven on to 500 degrees and place the hamburger bun halves face-down in the oven to toast while preparing your burgers.
  4. Grill or fry the burgers in your preferred method.  I found I didn’t even have to season them due to the strong flavors in the balsamic reduction and the pesto.
  5. Stack your burger: Bottom half of bun, burger patty, arugula, mozzarella slice, chopped tomatoes.  Drizzle the balsamic reduction over the tomatoes.  Spread a thick layer of the pesto on the top bun and drop it on top of the burger.  Voila!

It seems that everyone’s tastes are different when it comes to this burger–the boyfriend literally brought the pot of balsamic reduction to the table so he could keep slathering it on his burger while I couldn’t get enough pesto and would spread a little extra on each bite of burger.  The roommate happily ate hers without any extra additions at all.  So that means the solution is just to bring all the sauces to the table to let everyone choose for themselves!

Roasted Red Pepper Dip

12 Aug

I’m having a few friends over tonight to enjoy the beach air and a movie so this is the first of a handful of quick & easy party recipes I have stored up my sleeve for you lovely people.

On any night, my favorite bar food is roasted red pepper dip.  It’s even better as an appetizer at home because when you’re stressing about party planning, this dip takes literally minutes, minimal dishes to clean up later, and then voila!  One less thing on your mind to worry about.

This recipe in particular has just a hint of dairy in it to give it richness and a smooth texture without overdoing it, yet the roasted pepper flavor is still the star.  As you know by now, I am a garlic lover, so you may want to reduce the recipe to just one clove if you’re not so inclined to super garlicky recipes.

Roasted Red Pepper Dip
Adapted from Smitten Kitchen

  • one 15 oz can of white cannelini beans, drained
  • 1 jar roasted red peppers, drained
  • 3 oz cream cheese
  • 2 cloves of garlic
  • 1/4 teaspoon paprika
  • 1/4 teaspoon salt
  • juice from 1/2 of a lemon
  1. Put all ingredients in a food processor or blender.
  2. Blend.
  3. Serve with pita chips or sliced veggies.

Even simpler than whipping this up the day of the party is whipping it up the night before! I promise you can throw this together during a commercial break on tv and go to sleep knowing it’s one less thing you have to accomplish the next day.

Garlic Corn on the Cob

3 Aug

For those of you who didn’t see my ecstatic posts on Facebook this weekend (follow A Gilt Nutmeg on Facebook here!), I was at the Garlic Festival in Gilroy, CA last weekend.  The boyfriend and I can actually eat garlic raw and were disappointed with the lack of garlic at the entirely garlic-centric menu at “The Stinking Rose.”  So finally we were going to get a proper dose of garlic!  And proper dose we did: garlic bread, garlic tamales, deep fried garlic, garlic pesto, garlic ice cream (which is actually one of my favorite flavors of ice cream ever)…but one of the best things we ate was garlic corn on the cob.

Daniel and our friend, Rhianan, enjoying their corn.  I was digging into the deep fried garlic at the time, but I snuck bites of Daniel’s corn whenever he wasn’t looking.

So home we went, stopping on the way for those amazing strawberries from Monday’s post and fresh picked corn, 6 for $1.  Is there any need to guess what my plans for the corn were?  It was my mission to try to recreate the amazing clean, clear butter-garlic flavor on the sweet fresh corn we ate the day before.

One of the cooking tricks I pulled out of the hat for this one was something called “blooming”.  As spices get older, they lose flavor and heat (if they’re spicy).  The remedy for this is to “bloom” the spices by heating them in oil or butter for a minute or so.  It magically brings back all the flavorful oils in them and your taste buds will thank you!  I’ve also discovered that clarifying your butter really set the garlic and sweet corn flavors off the best–I’m never going back to slapping a cold pat of butter onto my corn again.

Aim for farmers markets or farm stands for your corn.  Dad taught me long ago that there are few things better than fresh farm corn–he used to drive all the way to New Jersey to get fresh corn from the farm stands.

Garlic Corn on the Cob

  • fresh ears of corn, stripped of leaves and “silk” (the stringy bits)
  • 5 cloves of garlic, sliced
  • 1 tablespoon of butter per ear of corn
  • 1 teaspoon garlic powder (or to taste)
  • high quality salt
  1. Set a large pot of water boiling and toss in approx 2 sliced cloves of garlic.  Set ears of corn into boiling water and boil for approx 15 minutes or to desired doneness.  I remember growing up we just turned off the burner and left the corn in the pot of hot water until we went back for seconds, so I don’t think there’s really a danger of overcooking it.
  2. In the meantime, gently melt the butter in a small saucepan.  After it’s completely melted, tilt the pot forward and carefully use a spoon to remove just the white floaty bits–these are called the milk solids.  Voila, clarified butter!  You’re ready for lobster…or really amazing corn.
  3. Add the rest of the sliced garlic plus the garlic powder to the butter and stir.  Remove from heat after a few minutes and brush the butter over the ears of corn.  I leave the garlic slices behind, but if you want to brush them over the corn as well, be my guest–there’s really never too much garlic in my book!  You’ll probably want them minced instead of just sliced if you plan on doing this, so the garlic bits can stick to the ears of corn.
  4. Sprinkle with some good salt and get ready for a delicious treat!  On one final note: I mentioned that there is never enough garlic for me.  This recipe will give you a delicate, even garlic flavor for your corn.  I absolutely kicked it up an extra notch by sprinkling additional garlic powder directly on the corn as well, but that level of garlic is not for everybody 🙂

Plum Butter

25 Jul

Every fall I eagerly await apple season: it means apple juice, apple sauce, and caramel apples (never mind the fact that I’m actually allergic to apples…I just pretend like I’m not).  My favorite of all apple treats though, is apple butter.  But looking at the calendar, it’s in the middle of summertime and apple butter time isn’t even close!  That said, summertime is a cook’s dream because of the wide variety of fresh produce available.   So instead of whining about apple butter not being in season, why not take summer’s best fruits and make them into fruit butter instead??  And thus, plum butter was born.

Deliciously tart, a little sweet and a little spicy, plum butter is one of my new favorite ways to wake up on a summer morning.

Because I brought my batch of plum butter to an event in Venice and since there would be no refrigeration, I had to go through the canning process to ensure the people taking home my plum butter wouldn’t keel over with botulism.  That said, while hot and steamy for sure, the canning process is really not the big deal everyone makes it out to be.  Three easy steps:  1) heat the jars in water so they don’t break when you put hot food in them 2) fill with food 3) boil the jars for 5 minutes and then turn off the burner and let the water cool for 5 minutes before taking the jars out of the water.  Seriously, that’s it.  I couldn’t believe it either!

Even better news: if the plum butter isn’t leaving your house and you’re planning on eating it within a few weeks, then all you need to do is stick it in the fridge and call it good.  No steamy canning needed!  If you want to make a lot and store it in your pantry, then canning is necessary.  Truthfully, I haven’t tried freezing it yet, but I bet that would be a great option if you have just an extra jar or two but don’t want to go through the canning process.  Anyone out there who tries it, let me know!  So now, without further ado…summer’s finest at it’s most concentrated deliciousness.

Note: I made two batches of butter, one in my cast iron Le Creuset and the other in my normal stainless steel cookware.  The batch made in my Le Creuset thickened much faster than the one in my stainless steel pot.  I highly suggest using a cast iron pot if you have it.

Also Note: The canning instructions I wrote out below are for sea level altitude, since I’m right here on the coast.  Apparently boiling times are longer for higher altitudes.  Of course, I am no canning expert, this being my first time, so definitely consult the instructions that come with your new tray of canning jars!

Plum Butter
makes about 4 cups
adapted from Martha Stewart

  • 3 1/2 lbs plums (I used the larger black plums instead of red plums)
  • 1 1/4 cup sugar
  • 1 cup water
  • 3/4 teaspoon cardamom
  • 3/4 teaspoon cinnamon
  1. Dice plums into approximately 1″ pieces (about 8 pieces per half) and discard pits
  2. Put plums, sugar, and water into 6 qt pot, bring to a boil then reduce to a simmer (I forgot what I was doing and it boiled over, just fyi, it could happen to you); cook until fruit is very soft, approx 20 minutes
  3. Puree contents of pot in blender.  I used a food processor, which worked fine, but it is not liquid tight and I certainly had to wipe down the base of the processor after it a all said and done because some of the puree had worked its way up up under the blade and out underneath the workbowl.
  4. Return puree to sauce pan and add cinnamon and cardamom, stir.
  5. Cook puree down until thick and spreadable, about 3 hours, stirring often to prevent scorching.  I used a regular balloon whisk to stir the butter and by the end, when you take the whisk out, it is thick enough that you will see an imprint left behind of the whisk tines.
  6. While the puree is in the homestretch of thickening, place your mason jars and the flat parts of the lids into a large pot, cover with water and turn the burner on very low.  The point is just to warm up the jars and lids so that they won’t shatter when you put hot food into them (leave the rings out of the water so they’re cool for you to twist them onto the jars later).
  7. When the jars are warm and the butter is fully thickened to your liking, fill the jars up with butter, stopping about a 1/2 inch from the top of the rim to leave some air in the top of the jar.  Place a flat lid on the jar and twist on the ring.
  8. Heat up another large pot of water to simmering and put jars full of butter into the simmering water.  Turn up the heat to boil the water; boil jars for 5 minutes.  Turn off the burner and leave the jars in the water (you’ll see bubbles still escaping from under the jar lid during the cool down phase, this is good).  Take the jars out and set them on a towel on the counter top.  The instructions say to leave the jars undisturbed for 12-24 hours (I did not have that luxury of time).  You’ll know you’ve done a successful canning job if the lid is firm and doesn’t pop up and down when you press on it.  Some of mine popped slightly after I took them out of the pot, but were firm when I came back in the morning.  If the jars still pop, put them in the fridge and just eat them soon instead of shelving them.

P.S. if you want alerts on each post that I write (I try to post M/W/F), follow my blog on Facebook!

Tomato Mozzarella Avocado Salad

20 Jul

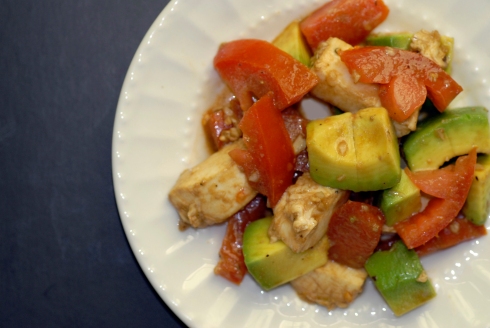
It is a decided fact that you cannot take a good photo of beautiful, snow white mozzarella once it’s been tossed with balsamic vinegar.  The good news is, this salad is DELICIOUS.  It’s what got me eating avocado finally after a good two years of living in California and turning my nose up the stuff.  It also got my roommate eating tomatoes, so I’m pretty sure this salad has secret magic in it.

Best of all, it can be thrown together in the miniscule time it takes you to chop up 4 little ingredients.  I was so hungry when I got home from yoga last night that I was literally was “throwing” the salad together.  It was as if there was a race between me and my stomach–if I win, I get fed, if my stomach wins, I die of starvation.

That all said, this is delicious Californian start to any meal or a meal in itself and shows off the best of California summer produce.

Tomato Mozzarella Avocado Salad
serves 2-4 as a side

  • 1 ripe tomato
  • 1 ripe avocado
  • 3 golf ball sized fresh bocconcini or a handful of smaller sized mozzarella balls, the kind found in a container of water
  • 3 cloves of raw garlic (this will make for a spicy salad, which is delicious, but you can adjust to your own taste)
  • balsamic vinegar
  • olive oil
  • salt & pepper

…I’m not sure instructions can get any easier than this….

  1. Chop tomato and avocado; toss into bowl (for full disclosure…I get rid of the tomato seeds…they’re a culinary pet peeve of mine)
  2. Chop bocconcini into bite sized pieces, if using small mozzarella balls, slice in half; toss into bowl
  3. Finely chop garlic cloves; toss into bowl
  4. Drizzle contents of bowl with 2 parts balsamic vinegar and 1 part olive oil
  5. Salt & pepper to taste
  6. Enjoy!

Skillet Glazed Drumsticks

14 Jul

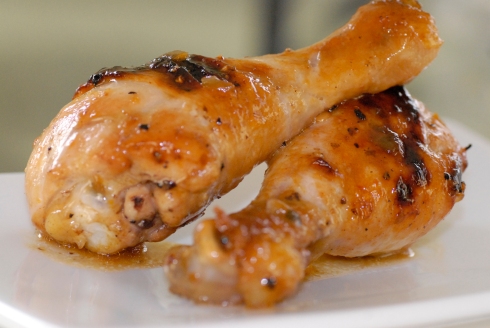
True Confession:  I love buying rotisserie chickens from the grocery store.  They’re fast and delicious and so easy after a long day at work.  But sometimes you want something a little more interesting and this recipe is just the trick!  If you’ve never pan-roasted before, you are in for a treat–you get the delicious browned outside of the chicken from cooking it in the skillet on the stove-top, yet popping it in the oven to finish cooking means you’re going to still end up with moist chicken.  Don’t let the presence of jalapeno jelly make you think this is a spicy dish–unless you add a lot of hot sauce.  In the end, I could barely taste any spicy heat at all!

Before we go any further, make sure you have a large skillet that is able to go in the oven.  That means no plastic handles and, just because it seems like a good idea, I try not to put non-stick pans in the oven.  Who knows what chemicals were used to make it non-stick and I’d rather not have that melting into my food.  I will warn you that while certain ingredients aren’t exactly fun to work with (cleaning out a raw chicken, for example), I never really am completely grossed out by them.  That said?  Jalapeno jelly was disgusting!  and I normally love jalapenos!  ….have I whet your appetite yet?  The end product here is delicious, though, so just dive right in and go for it because you’ll love what you’re eating for dinner–not your average chicken dish!

Skillet Glazed Drumsticks
recipe source: America’s Test Kitchen 30 Minute Suppers Summer 2010
Serves 4

  • 3 tablespoons jalapeno jelly
  • 1 teaspoon grated zest and 2/3 cup juice from 2 large oranges
  • 1 shallot, minced
  • hot sauce
  • 2 tablespoons molasses
  • 1 teaspoon cornstarch
  • 8 chicken drumsticks (about 3 pounds)
  • salt and pepper
  • 2 tablespoons vegetable oil
  1. Adjust oven rack to middle position and heat oven to 450 degrees.  Combine jelly, orange zest and juice, and shallot in small saucepan, add a few dashes of hot sauce to taste.  (I probably put in a teaspoon or so and could barely taste any spice at all.)  Whisk in molasses and cornstarch.  Simmer mixture over medium heat until thickened, about 5 minutes.
  2. Meanwhile, pat chicken dry with paper towels and season with salt and pepper.  Heat oil in large skillet over medium-high heat until just smoking.  Cook chicken, turning once or twice, until well browned.
  3. As best you can manage it without dumping the chicken out of the pan too, pour off remaining oil.  Pour the heated glaze over the chicken in the skillet, turning chicken until thoroughly coated.  Transfer skillet to oven and roast until chicken registers 175 degrees, 20 to 25 minutes, flipping chicken halfway through.
  4. Transfer chicken to platter, season glaze with salt and pepper to taste, and pour glaze over chicken.

Lobster BLT

5 Jul

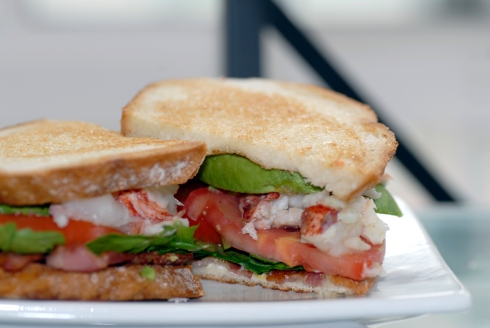
This sandwich will change how you feel about BLTs forever.  It will change how you feel about lobster forever.  Basically, you need to try this sandwich as soon as you can.  And if you don’t like lobster (!?) or can’t eat shellfish, then this will give you a really great basic BLT sandwich that I promise you’ll love more than any BLT you’ve ever had, just by switching up a few of the basic steps that make for a mediocre BLT.  Since BLTs are my favorite sandwiches, trust me, I’ve had my fair share of poorly made BLTs–the toast is too toasted and the bacon is super crisp and all of this leaves the roof of your mouth completely torn up and worst of all, there isn’t any flavor other than mayo–how is that possible!?

Trick one: fresh ingredients.  Best to make this sandwich when things like tomatoes are actually in season so you don’t have a bland sandwich.  Lobster was on sale when I bought mine so I got a little tail for $6-8 and just froze it until I was ready to make this.  You’ll note that I have garlic infused olive oil listed in the ingredients.  I suggest you find a bottle of this stuff right this moment–drop what you’re doing and just go.  You will thank me later.  You can use it in a TON of dishes and, really, it’s really one of the secrets to making this a great sandwich.  If you don’t like garlic you can use butter instead.

Lobster BLT with Citrus Mayonnaise
makes 1 delicious sandwich

  • 1 lobster tail
  • 3 slices bacon
  • arugula
  • ripe tomato
  • ripe avocado
  • 1 tablespoon mayonnaise
  • 1 teaspoon lemon zest
  • 2 tablespoons lemon juice
  • 2 pieces high quality rustic round loaf sandwich bread such as sourdough
  • garlic infused olive oil (or butter)
  • salt and pepper
  1. Get a pot of water boiling with a steamer basket inside.  Once the pot is at a rolling boil, place the lobster tail inside and cover the pot with the lid.  Let the tail steam 5-10 minutes.  The shell will turn red and the meat will be a pearly white.  Truthfully, I’d rather have my shellfish underdone rather than overdone (it gets chewy) but if you’d rather have it well done, leave it in for a few minutes longer just to be safe.  When it’s done, take the steamer out and run the tail under cold water to stop it from cooking any more; set aside.
  2. Set three strips of bacon frying.  One of the secrets to this sandwich: do not cook the bacon till crispy! Fry it until done, but still floppy.  Again, if this makes you nervous, go ahead and fry the living daylights out of it, but your sandwich won’t be as delicious because you’ll be eating carbon bacon.
  3. While the bacon is frying (don’t forget to flip it half way through!), slice your avocado and tomato and chop up your lobster tail.  Don’t worry about being gentle with the shell–you’re chopping up the meat anyway.  I took a large chef’s knife, placed it along the underside of the tail and pressed down until the softer under part cracked.  Then I was able to pry the shell apart and pull out the tail.  Chop coarsely.
  4. At this point, your bacon is likely finished; Place the finished bacon on a paper towel to soak up that extra grease you don’t need, turn off the burner, and take a wadded up paper towel and wipe the frying pan clean of the bacon grease while it’s still hot.
  5. Stir together the mayonnaise, lemon zest, and lemon juice–I preferred more lemon juice than not, as I actually don’t like the taste of mayo.
  6. Turn the burner on again under your frying pan.  Lightly brush both sides of your bread with the garlic olive oil (or just lightly butter each side) and toss the bread, one piece at a time into the frying pan, frying each side until golden–this is one of the secret tricks to the sandwich.  Instead of toast so stiff that everything falls out from between the slices, this warm, garlic-buttery delicious bread is still soft enough to not scratch the roof of your mouth, but sturdy enough to hold all of the ingredients.
  7. Finally, assemble!  Spread the citrus mayo on one of the bread slices, layer with bacon, arugula, tomato (salt and pepper here), lobster chunks, and avocado.

Like I said, game changer in the sandwich world–I’m never going back to bad diner BLTs.